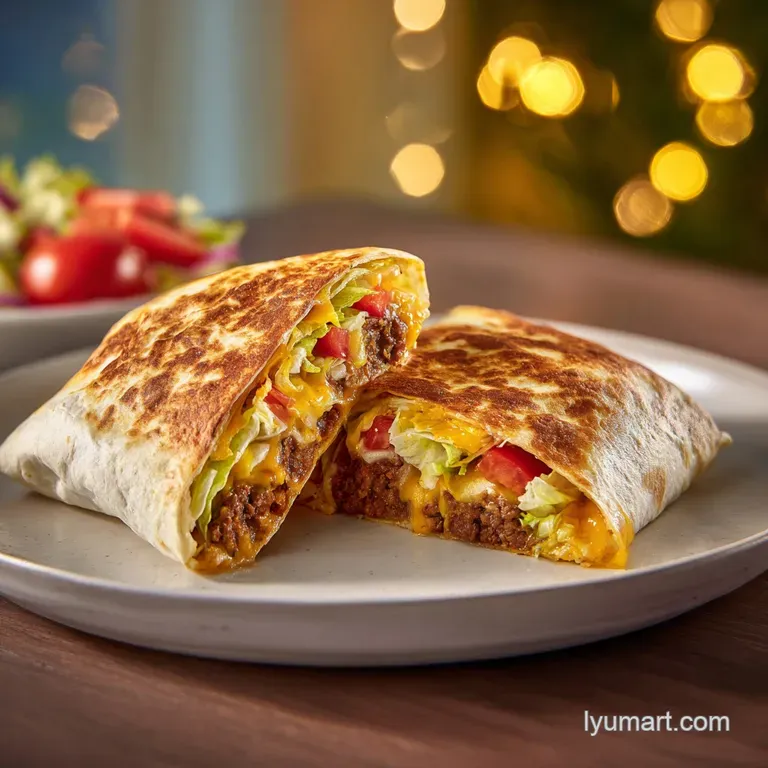
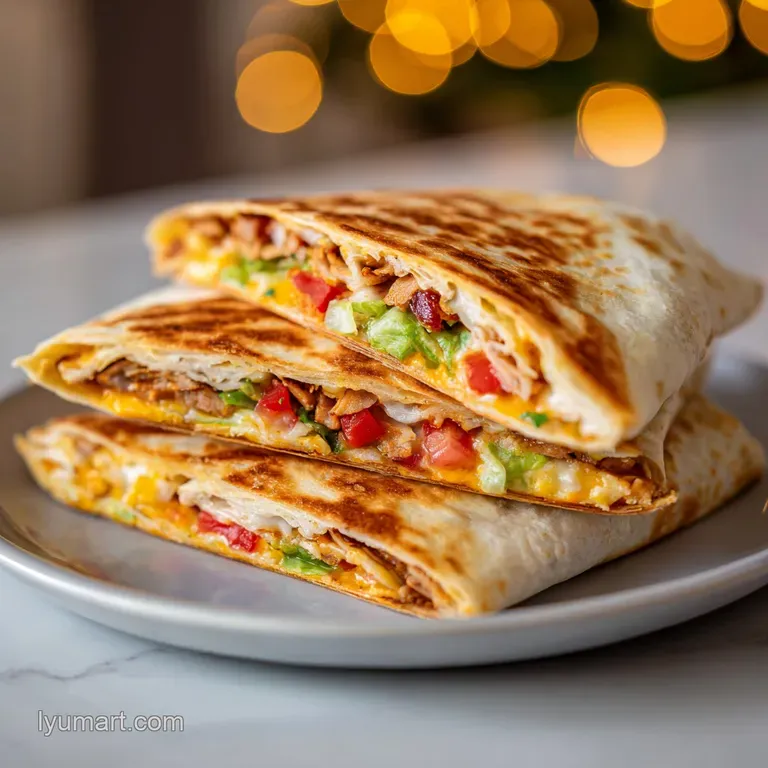
Homemade Crunchwrap Supreme
- Time: Active 10 minutes, Passive 10 minutes, Total 20 minutes
- Flavor/Texture Hook: Shatter crisp core with savory beef
- Perfect for: Busy weeknights or late night comfort cravings
- Mastering the Perfect Homemade Crunchwrap Supreme
- Structural Logic and Flavor Science
- Element Analysis for Best Results
- Essential Elements for Success
- Tools for a Golden Sear
- From Prep to Plate
- Fixes for Common Kitchen Fails
- Swaps for Different Diets
- Kitchen Wisdom and Myths
- Storage and Smart Leftover Hacks
- Perfect Sides for Your Meal
- CRITICAL High in Sodium
- Recipe FAQs
- 📝 Recipe Card
Mastering the Perfect Homemade Crunchwrap Supreme
The aggressive sizzle of cold ground beef hitting a hot cast iron skillet is honestly one of my favorite sounds in the kitchen. It is the first sign that you are about to fix the biggest problem with fast food copies: that sad, lukewarm, soggy mess that happens when a tortilla sits in a cardboard box for twenty minutes.
We have all been there, biting into what should be a crispy treat only to find a texture that resembles a wet paper towel. It is heartbreaking, but it is also completely avoidable once you know a few simple tricks.
I remember the first time I tried to make these for the family. I overstuffed the tortilla so much that it looked like a bloated balloon, and the moment it hit the pan, the whole thing unraveled like a bad sweater.
It was a disaster, but it taught me everything about the "hexagonal fold" and why the order of your layers actually matters for more than just looks. This version is all about that satisfying, humble comfort that works every single time without needing fancy gadgets.
We are going to build something here that stays structurally sound from the first bite to the last. We'll use a specific layering logic to protect the crunchy tostada shell from the wet ingredients, ensuring that when you bite down, you get that iconic shatter.
It is simple, it is reliable, and it is going to become a staple in your house just like it did in mine. Let's get into how we make this classic dish actually live up to its name.
Structural Logic and Flavor Science
Moisture Shielding: Placing the tostada shell between the hot beef and the cold sour cream prevents the tortilla from steaming and losing its structural integrity.
Starch Gelatinization: Searing the flour tortilla creates a toasted exterior that hardens as it cools, acting as a rigid frame for the soft fillings.
Fat Emulsification: Simmering the taco seasoning with water and beef fat creates a thick glaze that clings to the meat rather than running off and making the wrap greasy.
Thermal Insulation: The layers of lettuce and tomato act as a heat buffer, keeping the fresh vegetables cool and crisp even as the beef stays piping hot.
| Method | Total Time | Resulting Texture | Best Situation |
|---|---|---|---|
| Heavy Skillet | 6 minutes | Deep mahogany, very crispy | Maximum crunch, single servings |
| Sheet Pan Oven | 12 minutes | Evenly golden, slightly softer | Feeding a crowd all at once |
| Air Fryer | 8 minutes | Extremely brittle and flaky | Extra crunch with less oil |
When you choose the stovetop method, you are getting the most direct heat, which is what gives you that beautiful, toasted color. The oven is great if you are trying to feed six people at once, but you lose a little bit of that specific "fried" flavor that makes this dish so satisfying.
I always reach for my heaviest skillet because it holds the heat better and gives the tortilla a more uniform sear.
Element Analysis for Best Results
| Ingredient | Science Role | Pro Secret |
|---|---|---|
| 12 inch Tortilla | Structural Base | Microwave for 10 seconds to make it pliable and prevent cracking. |
| Ground Beef (90/10) | Protein Foundation | Drain the fat completely to avoid a greasy, leaking bottom. |
| Tostada Shell | Internal Crunch | Check for freshness; a stale shell ruins the entire sensory experience. |
| Nacho Cheese | Flavor Emulsifier | Spread it thin to act as a "glue" for the seasoned beef. |
Actually, if you find that your tortillas are tearing when you fold them, it's usually because they are too cold. A quick zap in the microwave or a few seconds over a gas flame makes them act like fabric instead of paper.
It makes the "patch" method so much easier to execute without feeling like you need three hands to hold the folds in place.
Essential Elements for Success
- 1 lb lean ground beef (90/10 ratio) Why this? Leaner beef prevents excess grease from soaking into the bottom tortilla layer.
- 2 tbsp taco seasoning Why this? Provides the classic, familiar salt and spice profile we expect.
- 1/4 cup water
- 1/2 tsp smoked paprika Why this? Adds a hint of flame grilled depth that standard seasoning lacks.
- 4 extra large 12 inch flour tortillas
- 4 small 6 inch flour tortillas
- 4 crunchy tostada shells
- 1/2 cup nacho cheese sauce
- 1/2 cup sour cream
- 1 cup shredded iceberg lettuce
- 2 Roma tomatoes, diced
- 1 cup shredded Mexican blend cheese
| Original Ingredient | Substitute | Why It Works |
|---|---|---|
| Ground Beef | Ground Turkey | Lower fat content; needs 1 extra tbsp of water for moisture. |
| Tostada Shells | Folded Corn Tortillas | If you can't find tostadas, fry a corn tortilla flat in oil. |
| Nacho Cheese | Sharp Cheddar Melt | Use a splash of milk to melt cheddar into a thick paste. |
| Roma Tomatoes | Cherry Tomatoes | Lower water content; keeps the wrap from getting soggy inside. |
Choosing the right tomato is actually a huge deal here. Roma tomatoes are meatier and have fewer seeds, which means less liquid running around inside your wrap. If you use a super juicy beefsteak tomato, you might find your lettuce getting wilted and sad before you even finish your first half.
Stick to the Romas for the best structural results.
Tools for a Golden Sear
To get that classic, humble finish, you really don't need a lot of gear. A large, heavy bottomed skillet is your best friend here. I prefer cast iron because it distributes the heat so evenly, but a good non stick pan works wonders for making sure those folds don't stick and tear.
You will also want a sturdy spatula to press down on the wrap during the sear this ensures every part of the tortilla makes contact with the heat.
A sharp chef's knife is non negotiable for dicing those tomatoes. If your knife is dull, you'll end up crushing the tomato and releasing all that juice, which we already talked about being the enemy of crunch. Other than that, a few small bowls for your "assembly line" will make the process go ten times faster.
This isn't about being a gourmet chef; it's about being organized so your beef stays hot while you build.
From Prep to Plate
- Brown the beef. In a large skillet over medium high heat, cook the 1 lb lean ground beef until no pink remains. Note: Use a spatula to break the meat into very small, uniform crumbles for better layering.
- Drain the fat. Tip the skillet over a heat safe bowl and remove every bit of excess liquid. Note: This is the most important step for preventing a "soggy bottom" later.
- Season and simmer. Stir in the 2 tbsp taco seasoning, 1/2 tsp smoked paprika, and 1/4 cup water. Simmer 3 to 5 minutes until the liquid is gone and the meat is glossy.
- Prep the base. Lay one 12 inch tortilla on a flat surface and spread 2 tbsp of warm nacho cheese in a 5 inch circle right in the center.
- Add the beef. Place a scoop of the seasoned beef directly onto the nacho cheese.
- Create the barrier. Press a crunchy tostada shell firmly on top of the beef. Note: This creates the physical wall between the hot meat and the cold toppings.
- Layer the freshness. Spread a thin layer of sour cream on the tostada, then add the shredded lettuce, diced tomatoes, and shredded Mexican cheese.
- Apply the patch. Place a 6 inch tortilla over the center of the toppings. Fold the edges of the large tortilla up and over the patch until you have a tight hexagonal shape.
- Sear the seam. Place the wrap seam side down in a dry, pre heated skillet over medium heat. Note: Do not use oil in the pan; a dry sear creates a crispier, less greasy exterior.
- Toast the top. Cook for 2 to 3 minutes per side until the tortilla is mahogany brown and firm to the touch.
| Thickess | Heat Level | Cook Time | Visual Cue |
|---|---|---|---|
| 1.5 inches | Medium | 3 mins/side | Gold edges, firm folds |
| 2.0 inches | Medium Low | 4 mins/side | Steam stops rising |
| 1.0 inch | Medium High | 2 mins/side | Deep brown spots appear |
You want to be patient during the searing phase. If the heat is too high, the outside will burn before the internal cheese has a chance to melt and bond everything together. If you find the wrap is unfolding in the pan, just give it a gentle press with your spatula for the first thirty seconds.
Once that starch heats up, it acts like glue and will hold the shape on its own.
Fixes for Common Kitchen Fails
The Great Tortilla Blowout
If your tortilla is splitting at the seams, you are likely dealing with one of two things: either you overstuffed the center or your tortilla is too dry. I have made the mistake of trying to fit a double portion of beef inside, and it never ends well.
The "patch" (that smaller tortilla) is your insurance policy, but it can only do so much. If it happens, don't panic. Just flip it carefully and let the cheese melt over the tear; it won't be as pretty, but it will still taste incredible.
The Sad Soggy Center
This usually happens because the lettuce and tomatoes were still wet from being washed. When that water hits the heat of the beef, it creates steam inside the wrap. The tostada shell tries its best to be a shield, but steam finds a way.
Always pat your diced tomatoes and shredded lettuce dry with a paper towel before they go into the assembly line. It seems like a small step, but it makes a massive difference in the final texture.
| Problem | Root Cause | Solution |
|---|---|---|
| Tortilla cracks | Tortilla is too cold/stiff | Microwave for 10 seconds before folding. |
| Wrap falls apart | Folds weren't held down | Sear seam side down first for 3 full minutes. |
| Cold center | Beef wasn't hot enough | Ensure beef is simmering right before assembly. |
Common Mistakes Checklist
- ✓ Pat the lettuce and tomatoes completely dry (prevents internal steaming)
- ✓ Preheat your skillet for at least 3 minutes (ensures instant searing)
- ✓ Avoid overfilling the center (the folds need room to overlap)
- ✓ Drain every drop of fat from the beef (prevents grease leaks)
- ✓ Use the "patch" tortilla to cover any gaps in the center fold
Swaps for Different Diets
Scaling this recipe up for a big game night or a family gathering is actually pretty straightforward. If you are doubling the batch to serve 8 people, you'll need 2 lbs of beef. However, don't just double the water start with 1/3 cup instead of 1/2 cup, as the larger volume of meat retains heat and moisture more effectively.
You don't want the meat to be "soupy."
If you're cooking for just one or two, you can easily halve the beef. For the smaller tortillas, if you don't want to buy a whole pack of 6 inch ones, you can actually use a bowl to cut small circles out of your 12 inch tortillas. It's a great little hack to save money and space in the pantry.
Just remember that the assembly time stays the same regardless of how many you make, so don't try to rush the folding process.
| Servings | Beef Amount | Tortillas (XL/Small) | Pan Size |
|---|---|---|---|
| 2 People | 0.5 lb | 2 / 2 | 10 inch Skillet |
| 4 People | 1.0 lb | 4 / 4 | 12 inch Skillet |
| 8 People | 2.0 lb | 8 / 8 | Griddle / 2 Pans |
When you are scaling up, work in batches. Don't try to cram four wraps into one skillet. They need space for the steam to escape from the sides, or they will end up "sweating" against each other and losing that crispiness we worked so hard for.
I usually keep the finished ones on a wire rack in a warm oven (about 200°F) while I finish the rest of the batch.
Kitchen Wisdom and Myths
There is a common belief that you need to oil the pan to get a crispy tortilla. Honestly, that is a myth. Using oil actually makes the flour tortilla absorb grease, turning it heavy and soft. A dry, hot pan creates a "toast" effect that is much more structural and satisfying.
The fat already inside the wrap (from the cheese and beef) will provide enough moisture to keep things from burning too quickly.
Another thing people get wrong is the "sealing" process. You don't need a flour and water slurry or "glue" to keep the wrap closed. The heat from the pan and the weight of the wrap itself will cause the starches in the tortilla to bond. Just place it seam side down and leave it alone for the full two minutes.
Every time you peek or move it, you are breaking that initial bond and risking a blowout.
Storage and Smart Leftover Hacks
Fridge life for an assembled wrap is short maybe 24 hours. The lettuce will inevitably wilt, and the tostada shell will lose its fight against the sour cream. If you know you'll have leftovers, store the components separately. The seasoned beef stays great in the fridge for up to 4 days.
When you're ready for round two, just reheat the beef and assemble a fresh wrap. It takes five minutes and the quality is a thousand times better than a day old soggy wrap.
For a zero waste approach, save the "guts" of the tomatoes that you scooped out and use them in a quick salsa or toss them into a soup. If you have leftover tortillas that are starting to get a little dry, cut them into triangles and fry them in a little oil for homemade chips.
Nothing in this recipe should go to waste; even the leftover nacho cheese can be drizzled over broccoli the next night to make the kids actually eat their greens.
Perfect Sides for Your Meal
When it comes to pairing, I usually keep things simple. Since the wrap is so heavy on carbs and protein, a bright, acidic side is the way to go. A quick cucumber and lime salad or even just some extra pickled jalapeños can cut through the richness of the nacho cheese.
If you're feeling fancy, a side of cilantro lime rice is the classic companion, but honestly, these are so filling that most people find the wrap is a complete meal on its own.
Trust me on this: avoid serving anything too "wet" like a heavy bean soup on the same plate. You don't want any liquid migrating toward your crispy wrap. If you want to go the dipping route, a small bowl of spicy ranch or a zesty avocado crema is brilliant.
It's comfort food at its finest humble, satisfying, and far better than anything you'll find at a drive thru window at midnight. Go ahead and give it a try; your kitchen is about to smell like the best taco shop in town.

CRITICAL High in Sodium
1740 mg 1740 mg of sodium per serving (76% 76% of daily value)
The American Heart Association recommends limiting sodium intake to no more than 2,300mg per day.
Tips to Reduce Sodium
-
Low-Sodium Taco Seasoning-30%
Replace the 2 tbsp of standard taco seasoning with a low-sodium version. This is a major sodium contributor and a direct swap can significantly cut down sodium.
-
Reduced Fat Cheese-15%
Switch to reduced sodium shredded Mexican blend cheese. While all cheeses have some sodium, opting for a reduced sodium variety will lower your intake.
-
Lower Sodium Cheese Sauce-20%
Substitute the 1/2 cup of nacho cheese sauce with a homemade, lower sodium version or a commercially available low-sodium alternative.
-
Control Seasoning
Rely on herbs and spices like smoked paprika, cumin, chili powder, and garlic powder instead of added salt. Taste and adjust seasoning at the end if needed.
-
Fresh Tomatoes & Onion-5%
Use fresh Roma tomatoes and add diced onion for flavor instead of relying on potentially high sodium canned ingredients (though none are listed, this is a general tip for similar recipes).
Recipe FAQs
How to keep the tostada shell from getting soggy?
Pat your shredded lettuce and diced tomatoes completely dry before layering. Any excess moisture from these ingredients will compromise the crunch of the tostada shell during assembly.
Is it true I can store assembled Crunchwraps in the fridge for several days?
No, this is a common misconception. An assembled wrap lasts only about 24 hours before the ingredients wilt and the shell loses its texture; it is much better to store the beef separately for up to 4 days and assemble fresh.
How to prevent the tortilla from tearing while folding?
Avoid overfilling the center of the wrap. You need enough empty space on the edges of the large flour tortilla to successfully pull them over the center patch without stretching the dough too thin.
How to get a perfect golden seal on the skillet?
Preheat your dry, heavy skillet for at least 3 minutes before adding the wrap. Placing the crunchwrap seam side down in a hot pan ensures the folds lock into place instantly.
How to ensure the ground beef doesn't make the tortilla greasy?
Drain every single drop of excess fat after browning the meat. Leaving residual grease in the skillet will prevent the tortilla from crisping properly and often leads to structural failure.
Is it necessary to use a wet pan when searing the final wrap?
No, this is a common misconception. You must use a dry, pre-heated skillet to properly toast the exterior of the flour tortilla; adding oil or butter will make the wrap greasy rather than crisp.
How to fix gaps in the center during the folding process?
Place a small 6 inch flour tortilla over the toppings before you begin folding the large wrap. This patch serves as a protective bridge that keeps all the ingredients contained and prevents leaks.
Homemade Crunchwrap Supreme
Ingredients:
Instructions:
Nutrition Facts:
| Calories | 876 calories |
|---|---|
| Protein | 44g |
| Fat | 43g |
| Carbs | 76g |
| Fiber | 5g |
| Sugar | 6g |
| Sodium | 1740mg |
