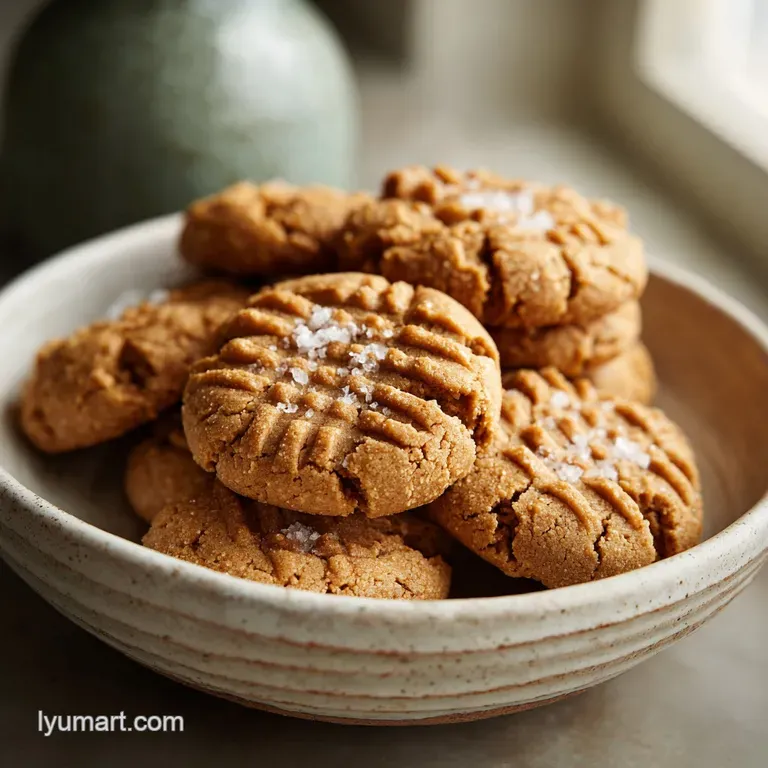
3 Ingredient Peanut Butter Cookies with Vanilla
- Time: Active 5 minutes, Passive 10 minutes, Total 15 minutes
- Flavor/Texture Hook: Deeply nutty with a buttery, velvety crumb and a crisp, sugary exterior.
- Perfect for: Last minute guests, gluten-free dessert needs, or beginner bakers.
- Why Flourless Baking Actually Works
- Essential Recipe Numbers and Ratios
- Deep Dive into Ingredients
- Tools for a Flawless Bake
- Step-by-Step to Cookie Perfection
- Plating Levels for Every Occasion
- Solving Texture and Spread Issues
- Swaps for Dietary Needs
- Storage and Waste Prevention Tips
- Perfect Pairings for Sweet Treats
- Recipe FAQs
- 📝 Recipe Card
Why Flourless Baking Actually Works
The science here is actually quite fascinating because we are skipping the traditional gluten structure entirely. Instead of wheat protein providing the "net" to hold the cookie together, we are using the protein found in the peanuts and the egg.
When the egg hits the heat, the proteins denature and tangle up, creating a solid structure that traps the sugar and fat. It’s a delicate balance that results in a much more tender bite than your average sugar cookie.
I’ve noticed that the vanilla extract does more than just add scent, it actually interacts with the sugar to round out the harshness of the salt and the intensity of the roasted nuts. By stirring the dough vigorously, you’re creating a temporary emulsion.
This is why the dough goes from oily and separated to a beautiful, matte ball that pulls away from the sides of the bowl. It’s a satisfying kitchen moment that signals you’re ready to roll.
| Method | Time | Texture | Best For |
|---|---|---|---|
| Standard Oven | 10 minutes | Crisp edges, soft center | Classic cookie lovers |
| Air Fryer | 7 minutes | Extra crunchy exterior | Quick single batch cravings |
| Toaster Oven | 12 minutes | Evenly browned and firm | Small apartments/dorm life |
Sugar also plays a double role here, acting as both a sweetener and a liquid. As the oven temperature rises, the sugar crystals melt, turning into a syrup that hydrates the peanut butter solids. This is why we don't need milk or water.
If you were to cut back the sugar too much, the cookies would end up dry and crumbly because there wouldn't be enough "liquid" to bind the peanut proteins during the bake.
Essential Recipe Numbers and Ratios
When we talk about the 3 Ingredient Peanut Butter Cookie with Vanilla, precision is your best friend. Even though there are only a few components, the ratio of fat to sugar is what prevents them from turning into a puddle on your baking sheet.
I always recommend using a standard measuring cup and leveling it off with a flat knife. It’s a small step, but it ensures that every batch comes out exactly like the last one.
I used to think that "a pinch of salt" was optional, but in a recipe this simple, it’s the catalyst that makes the peanut flavor pop. Without it, the cookies can taste a bit one dimensional. Think of it as the volume knob for your ingredients.
The vanilla extract follows the same logic, providing a floral bridge between the earthy peanuts and the sharp sweetness of the granulated sugar.
| Feature | Fast Method | Classic Method |
|---|---|---|
| Flour | None (Peanut base) | 1.5 to 2 cups AP flour |
| Fat Source | Peanut Butter Oils | Butter or Shortening |
| Flavor Profile | Intense Nutty/Vanilla | Mildly sweet/Cakey |
One thing to keep in mind is the temperature of your egg. A room temperature egg incorporates much faster into the thick peanut butter than one straight from the fridge. If the egg is too cold, it can cause the fats in the peanut butter to seize up slightly, making the dough harder to stir.
If you're in a rush, just pop the egg in a bowl of warm water for 2 minutes while you prep your sheet pan.
Deep Dive into Ingredients
Choosing your peanut butter is the most important decision you'll make for this recipe. I strongly suggest a "no stir" creamy variety. Natural peanut butters that have a layer of oil on top can be temperamental in flourless recipes because the oil to solid ratio is often inconsistent.
If the dough feels too greasy, it's usually because the peanut butter wasn't emulsified well enough in the jar before you measured it out.
The sugar choice also matters more than you’d think. Granulated white sugar provides that classic "snap" and helps the edges caramelize. If you swapped it for brown sugar, the cookies would be much softer and potentially too fragile to pick up because of the extra moisture from the molasses.
Let's look at how these ingredients behave under the heat of the oven.
| Ingredient | Science Role | Pro Secret |
|---|---|---|
| Peanut Butter | Structural Base | Use "No Stir" for a consistent, non greasy dough |
| Granulated Sugar | Liquefier & Sweetener | Whisk with the egg first for a shinier crust |
| Large Egg | Protein Binder | Ensure it is at room temp for better emulsion |
| Vanilla Extract | Aromatic Bridge | Use pure extract over imitation for depth |
For the vanilla, go for the real deal if you can. Since there are so few ingredients, the quality of the vanilla extract really shines through. A Madagascar Bourbon vanilla adds a creamy, almost spicy note that complements the roasted nuts perfectly.
If you want to get fancy, you could even use vanilla bean paste to see those beautiful little black specks throughout your cookies.
Ingredient Science and Substitutes
- 1 cup (250g) Creamy Peanut Butter: Why this? Provides the fat, protein, and bulk of the cookie structure.
- Substitute: Almond butter (ensure it is thick and well stirred).
- 1 cup (200g) Granulated White Sugar: Why this? Creates the crisp texture and helps the cookies spread slightly.
- Substitute: Coconut sugar (will result in a darker, more caramel like flavor).
- 1 Large Egg: Why this? Acts as the primary binder to hold the flourless dough together.
- Substitute: 1/4 cup unsweetened applesauce (note: cookies will be much softer).
- 1 tsp (5ml) Pure Vanilla Extract: Why this? Enhances the sweetness and adds a professional aromatic finish.
- Substitute: 1/2 tsp Almond extract for a different nutty profile.
- 1 pinch Flaky Sea Salt: Why this? Balances the sugar and intensifies the roasted peanut notes.
- Substitute: Standard table salt (use half the amount).
Tools for a Flawless Bake
You don't need a stand mixer for this, which is part of the charm. A sturdy spatula or a wooden spoon is actually better because it allows you to feel the tension of the dough as it thickens. I prefer a large glass bowl so I can see if any sugar has settled at the bottom.
A cookie scoop is also a fantastic tool here; it ensures every cookie is exactly the same size, which means they all finish baking at the exact same second.
Don't skip the parchment paper or a silicone mat. Because these cookies have a high sugar content, they can be a bit sticky when they first come out of the oven. The parchment paper allows them to slide right off once they’ve had a few minutes to set.
If you bake them directly on a greased pan, they might spread too much or become difficult to remove without breaking.
Chef's Tip: Freeze your peanut butter for 10 minutes before measuring. This makes it much less sticky and easier to level off in your measuring cup without the mess.
Another unconventional trick is to use a heavy bottomed baking sheet. Thin, flimsy pans can warp in the oven, causing the cookies to slide into each other. A heavy pan distributes the heat more evenly, ensuring the bottoms don't burn before the tops are set.
If you only have thin pans, you can stack two of them on top of each other to create an insulation layer.
step-by-step to Cookie Perfection
- Preheat your oven to 350°F (175°C). Note: Proper preheating ensures the cookies set immediately upon entry.
- Line a baking sheet. Use parchment paper or a silicone mat to prevent sticking.
- Combine ingredients. In a large bowl, add the 1 cup of peanut butter, 1 cup of sugar, the egg, and the vanilla extract.
- Stir vigorously. Use a spatula to mix until the dough becomes smooth, shiny, and pulls away from the bowl.
- Portion the dough. Scoop rounded tablespoons (about 1 inch) and roll them between your palms into smooth balls.
- Space them out. Place the balls on the sheet about 2 inches apart to allow for slight spreading.
- Create the pattern. Press a fork into the top of each ball, then rotate 90 degrees and press again until the signature crosshatch appears.
- Bake for 10 minutes. Monitor them closely; the edges should be lightly golden but the centers will still look soft.
- Cool on the pan. Allow them to rest for at least 5 minutes until the structure firm up enough to move.
- Transfer to a rack. Move them to a wire rack to finish cooling completely for maximum crispness.
Plating Levels for Every Occasion
Even a 3 ingredient cookie can look like a masterpiece with the right presentation. I like to think of plating in three distinct levels, depending on who you are serving and how much time you have.
Sometimes a simple stack is all you need for a cozy movie night, but other times, a little extra effort goes a long way in making a simple treat feel like a "sweet treat magic" moment.
| Plating Level | Technique | Visual Result | Best For |
|---|---|---|---|
| Simple | Rustic stack on a wooden board | Homestyle and inviting | Family snacking |
| Polished | Perfectly aligned with a dusting of sugar | Professional and clean | Tea parties |
| Restaurant | Single cookie, chocolate drizzle, sea salt | High end and decadent | Dinner parties |
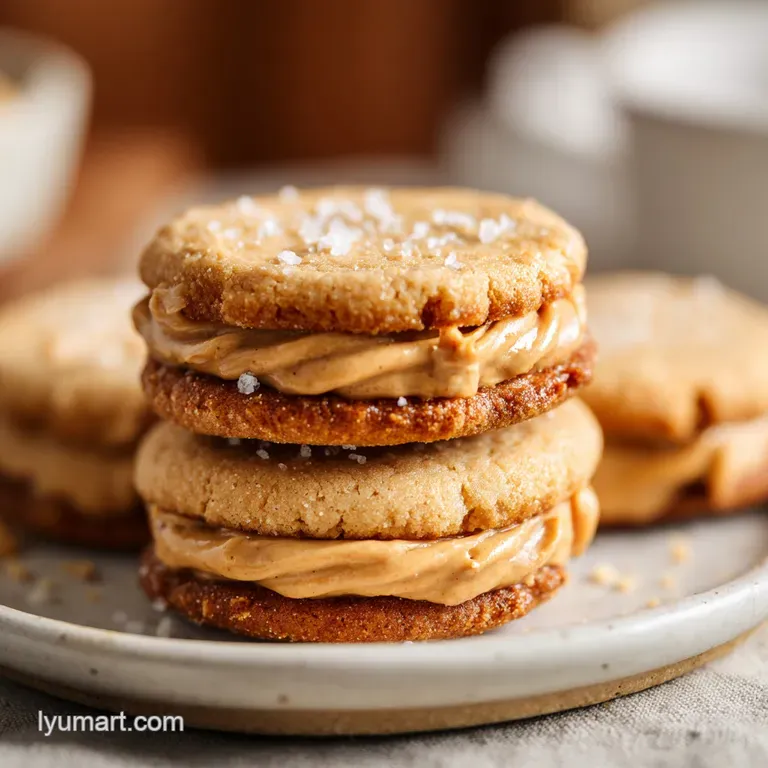
For the restaurant level, I love to pair this cookie with a small scoop of vanilla bean ice cream or even a dollop of peanut butter mousse. If you're feeling adventurous, try making my Heaven In A Bowl recipe and crumbling these cookies on top for an incredible texture contrast. The saltiness of the cookie plays so well with rich, chocolatey desserts.
Solving Texture and Spread Issues
One of the most common questions I get is about why the cookies sometimes crumble. Usually, this happens if the oven was a bit too hot or if they were left in for even a minute too long. Because there is no flour, these cookies rely entirely on moisture from the egg and the melting sugar.
Once that moisture is gone, they become brittle. If yours are crumbly, try pulling the next batch out when they still look "underdone" in the middle.
Why Your Cookies Spread Too Much
If your cookies turned into one giant pancake, the culprit is usually the peanut butter. Some "natural" brands have a very high oil content that stays liquid even at room temperature. To fix this, you can chill the dough for 30 minutes before rolling.
This solidifies the fats and gives the egg more time to set before the fat runs.
Why Your Cookies Are Too Hard
Overbaking is the main reason for a tooth shattering cookie. Remember, these cookies continue to cook on the hot baking sheet even after you take them out of the oven. This is called "carryover cooking." If they are already hard when you pull them out, they will be like rocks once they cool.
Achieving a Fudgy Center
For that sought after fudgy, brownie like interior, try using an extra large egg or adding one extra tablespoon of peanut butter to the mix. This slightly shifts the ratio in favor of moisture. You can also try underbaking them by about 90 seconds.
The result is a cookie that is almost truffle like in the center but still has those iconic crispy edges.
| Problem | Root Cause | Solution |
|---|---|---|
| Oily Texture | Unstirred natural peanut butter | Use processed "No Stir" PB or chill dough |
| Gritty Mouthfeel | Sugar didn't dissolve properly | Whisk egg and sugar together before adding PB |
| Burnt Bottoms | Dark or thin baking sheet | Use parchment and a light colored, heavy pan |
Common Mistakes Checklist: - ✓ Always use a Large egg; a Small egg won't provide enough binding protein. - ✓ Avoid "low-fat" peanut butter; the fillers can cause the cookies to become gummy.
- ✓ Don't skip the 5 minute cooling period on the pan; they will break if moved too soon. - ✓ Measure your sugar accurately; too much will make them spread and stick. - ✓ Ensure your oven rack is in the center position for even heat distribution.
Swaps for Dietary Needs
This recipe is already a hero for the gluten-free community, but we can take it further. If you are looking for a lower carb option, you can check out my Keto Peanut Butter Cookies which use alternative sweeteners. However, for this specific recipe, you can swap the granulated sugar for an erythritol based sweetener (like Swerve) at a 1:1 ratio. Just be aware that the texture will be slightly more "cooling" on the tongue.
For a vegan version, the egg is the trickiest part to replace. I’ve had success using a "flax egg" (1 tablespoon ground flaxseed mixed with 3 tablespoons water, set for 10 minutes).
The cookies won't rise quite as much and will be much softer, so you’ll need to let them cool completely about 30 minutes before they are stable enough to handle. It's a trade off, but the flavor remains incredibly nutty and rich.
If you have a peanut allergy, this recipe works surprisingly well with sunflower seed butter (SunButter). It has a similar fat and protein profile. One fun bit of science: SunButter can sometimes react with the leavening agents in other recipes to turn green, but since we aren't using baking soda here, your cookies should stay a lovely golden brown.
Storage and Waste Prevention Tips
To keep these cookies at their peak, store them in an airtight container at room temperature. They stay fresh and soft for about 5 days. If you live in a very humid environment, you might find they get a bit soft; in that case, popping a piece of white bread into the container can help absorb excess moisture.
For long term storage, these cookies freeze beautifully. Just layer them with parchment paper in a freezer bag and they'll last for 3 months.
Don't let any of those ingredients go to waste! If you have a tiny bit of peanut butter left in the jar that isn't enough for a full cup, you can actually mix the other ingredients directly in the jar for a "single serve" microwave version. For the vanilla, once you finish a bottle, don't throw it away.
Drop a few spent vanilla beans in there and fill it with vodka; in a few months, you'll have a fresh batch of homemade extract started. Even the eggshells can be crushed up and added to your garden soil for a calcium boost!
Perfect Pairings for Sweet Treats
These cookies are the ultimate companion for a cold glass of milk, but they also play well with other flavors. If you want to lean into the salt and sweet vibe, serve them alongside a sharp cheddar cheese plate it sounds wild, but the combination is a classic for a reason.
For a more traditional pairing, a cup of dark roast coffee or a smoky Earl Grey tea cuts through the richness of the peanut butter perfectly.
If you’re looking to build a full dessert spread, these cookies are a great anchor. They are small and flavorful, making them perfect for a platter. I often serve them with my Easy Peanut Butter Fudge for a "peanut butter lover's" theme. The different textures between the creamy fudge and the crisp cookie make for a really interesting tasting experience.
Another fun idea is to use them as the "bread" for an ice cream sandwich. Since they are flourless and slightly chewy, they don't get as rock hard in the freezer as traditional cookies.
Sandwich a scoop of chocolate or strawberry ice cream between two cookies, press the edges in some crushed peanuts, and you have a gourmet treat that looks like it took hours but only took minutes. It’s all about working smarter in the kitchen to get those high impact results!

Recipe FAQs
What are the three ingredient peanut butter cookies?
This recipe consists of creamy peanut butter, granulated sugar, and one large egg. We also include pure vanilla extract and a pinch of flaky sea salt to round out the flavor profile.
How to make 3 ingredient cookies easy?
Stir your peanut butter, sugar, egg, and vanilla vigorously in a bowl until the dough becomes smooth and shiny. Roll them into 1 inch spheres, press a crosshatch pattern with a fork, and bake at 350°F for exactly 10 minutes.
What is Snoop Dogg's cookie recipe?
No, this is a common misconception. The recipe featured here is a classic flourless method, while celebrity variations often include additional ingredients like butter, flour, or chocolate chips.
What are common peanut butter cookie mistakes?
Moving the cookies too soon is the biggest error. You must let them cool on the baking sheet for at least 5 minutes so the protein structure sets; if you enjoy mastering these delicate crumb structures, see how the same principle of protein setting applies to our gluten-free fudge brownies.
How to get the perfect crosshatch pattern?
Press the tines of a fork firmly into the center of each dough ball, then rotate the fork 90 degrees and press again. Using a clean, dry fork ensures the dough doesn't stick to the metal tines while you create the grid.
How to store these cookies?
Keep them in an airtight container at room temperature for up to 5 days. If the air is humid, place a slice of bread in the container to help regulate moisture levels.
Can I freeze the dough for later?
Yes, the dough freezes exceptionally well. Roll your 1 inch spheres and place them on a tray to flash freeze before transferring them to a freezer safe bag for up to 3 months.
3 Ingredient Peanut Butter Cookies
Ingredients:
Instructions:
Nutrition Facts:
| Calories | 116 kcal |
|---|---|
| Protein | 3.4 g |
| Fat | 6.5 g |
| Carbs | 12.5 g |
| Fiber | 0.8 g |
| Sugar | 11.1 g |
| Sodium | 57 mg |
