Nutella Fudge: Silky and Rich
- Time: Active 10 minutes, Passive 3 hours, Total 3 hours 15 mins
- Flavor/Texture Hook: Decadent hazelnut richness with a velvety, fudgy bite
- Perfect for: Holiday gift boxes, sudden sweet cravings, or a polished dinner party dessert
- Create Sweet Magic with This Nutella Fudge Recipe
- The Secret to a Velvety Glossy Texture
- Selecting Your Elements for Success
- Essential Tools for a Professional Finish
- The Step by Step Cooking Process
- Troubleshooting the Most Common Fudge Hurdles
- Scaling the Recipe for Any Crowd
- Debunking Common Kitchen Myths
- Keeping Your Sweet Treats Fresh
- Three Ways to Plate Your Fudge
- Inspiring Pairing Ideas
- Recipe FAQs
- 📝 Recipe Card
Create Sweet Magic with This Nutella Fudge Recipe
Picture this: it is a chilly Saturday afternoon, the kind where the light turns golden early and the house feels a bit too quiet. I remember standing in my kitchen last December, surrounded by halfway wrapped gifts and a pile of ribbons, realizing I had forgotten the "something sweet" for my neighbor's holiday basket.
I didn’t have time for a three hour baking project, but I wanted something that felt like a hug in a box. I reached for that iconic jar of hazelnut spread, and the kitchen was soon filled with the aroma of toasted nuts and melting cocoa.
That afternoon, I realized that some of the most inspiring treats don’t require a culinary degree or a whole day of labor. They just require the right balance of fats and sugars to create that signature "shatter" when you bite in, followed by a silky dissolve on the tongue.
This isn't just a snack; it’s a tiny piece of confectionery art that you can whip up while the kettle boils. It’s become my go to for everything from birthday parties to "just because" gestures for friends who need a little pick me-up.
We are going to walk through how to transform a few pantry staples into a dessert that looks like it came from a high end boutique. You don't need to worry about sugar crystals or grainy textures here.
We’ve all been there trying to make traditional fudge and ending up with a crumbly mess that feels like eating sweet sand. This method avoids those pitfalls entirely. It’s about the joy of the process and the magic that happens when chocolate and hazelnut finally meet.
The Secret to a Velvety Glossy Texture
Before we start stirring, let’s talk about why this specific combination of ingredients behaves the way it does. It isn't just luck; it’s about how we manage the fats and liquids to ensure everything stays smooth instead of separating into an oily puddle.
- Fat Stabilization: The hazelnut spread contains oils that remain liquid at room temperature, while the chocolate chips provide cocoa butter that firms up when chilled. Mixing them creates a hybrid fat structure that is soft enough to bite but firm enough to hold its shape.
- Sugar Suspension: Using condensed milk means the sugar is already dissolved in a concentrated liquid. This prevents the "gritty" texture common in stovetop fudge because we aren't waiting for granulated sugar to melt and recrystallize.
- The Salt Factor: A tiny amount of sea salt doesn't just make it salty; it actually suppresses the bitterness of the cocoa and amplifies the floral notes in the vanilla and the nuttiness of the hazelnuts.
| Thickness | Internal Temp | Rest Time | Visual Cue |
|---|---|---|---|
| 1 inch (standard) | N/A (Set by cooling) | 3 hours (minimum) | Surface loses its wet shine and feels firm to a light touch |
| 0.5 inch (thin tiles) | N/A (Set by cooling) | 1.5 hours | Edges pull away slightly from the parchment paper |
| 1.5 inch (thick blocks) | N/A (Set by cooling) | 5 hours | Center does not jiggle when the pan is gently shaken |
Choosing your chilling time is the most important decision you'll make today. If you're in a rush, a thinner layer sets faster, but there is something truly indulgent about a thick, heavy square that requires a slow, purposeful bite.
The science of the set is also heavily influenced by your choice of chocolate. Semi sweet chips usually contain stabilizers like soy lecithin which help the fudge hold its shape even if the room gets a little warm.
If you try to use a high percentage dark chocolate bar, you might find the fudge is much firmer and less "chewy."
| Ingredient | Science Role | Pro Secret |
|---|---|---|
| 14 oz Sweetened Condensed Milk | Provides the liquid base and pre dissolved sugar | Never use evaporated milk by mistake; it lacks the sugar density needed to set the fudge. |
| 12 oz Semi Sweet Chocolate Chips | Acts as the structural "skeleton" via cocoa butter | Use chips with at least 50% cocoa for a balanced sweetness that doesn't overwhelm. |
| 0.5 cup Nutella | Adds flavored fats and creates a "long" texture | Stir it in at the very end of the melting process to preserve the delicate hazelnut aroma. |
Selecting Your Elements for Success
When you head to the store for this nutella fudge recipe, quality really does change the outcome. Since we only have a handful of ingredients, each one has to carry its weight.
Look for a "pure" vanilla extract rather than the imitation kind the alcohol in the pure extract helps thin the fudge slightly for a better pour, while imitation can sometimes add a medicinal aftertaste when used in no bake settings.
- 14 oz sweetened condensed milk Why this? It provides the creamy, thick body that holds the chocolate together without cooking.
- 12 oz semi sweet chocolate chips Why this? They contain just enough cocoa butter to ensure the fudge sets firm.
- 0.5 cup Nutella (hazelnut spread) Why this? This adds that iconic roasted nut flavor and a silky mouthfeel.
- 1 tsp pure vanilla extract Why this? It bridges the gap between the earthy chocolate and the sweet milk.
- 0.25 tsp sea salt Why this? To cut through the sugar and make the hazelnut flavors pop.
- 0.5 cup chopped toasted hazelnuts Why this? Provides a much needed structural crunch to contrast the soft fudge.
| Original Ingredient | Substitute | Why It Works |
|---|---|---|
| Semi sweet chips | Dark chocolate (60%+) | Results in a more intense, less sweet fudge. Note: May set firmer than the original. |
| Nutella | Almond butter (smooth) | Creates a "Marzipan" style fudge. Note: Add 2 tbsp powdered sugar to match sweetness. |
| Toasted Hazelnuts | Chopped Walnuts | Offers a bitter tasting contrast. Note: Walnuts are softer and blend more into the fudge texture. |
If you are a fan of no bake treats that use these classic pantry staples, you might also enjoy my no bake peanut butter balls which use a similar fat to dry ratio to get that satisfying crunch and creamy center.
Essential Tools for a Professional Finish
You don't need a high tech lab, but a few specific tools will make your life much easier. First and foremost is a 8x8 inch square baking pan. I prefer metal pans with sharp 90 degree corners because they give you those crisp, professional edges that make the fudge look like it came from a candy shop.
Glass pans work too, but they have rounded corners which can make the end pieces look a bit "rustic."
A silicone spatula is also non negotiable. Because this mixture is incredibly sticky, a wooden spoon will just end up holding onto half your fudge. The silicone allows you to scrape every last drop of that chocolatey goodness out of the bowl and into the pan.
If you have a kitchen scale, I highly recommend weighing your chocolate chips. Bags are usually 12 oz, but if you’re using a bulk bin, getting that 12 oz (approx 340g) measurement exact is the difference between fudge that sets and fudge that stays "gooey."
Finally, parchment paper is your best friend. Don't just grease the pan; the fat in the fudge will eventually bond with the grease and make it hard to lift out. The "sling" method where you have long strips of paper hanging over the edges allows you to lift the entire block of fudge out onto a cutting board once it’s set.
This ensures you get clean, straight cuts without scratching your pan.
The step-by-step Cooking Process
- Line an 8x8 inch square baking pan with parchment paper, leaving an overhang on the sides to act as a sling for easy removal. Note: This prevents the fudge from sticking and makes clean up a breeze.
- In a medium heat proof glass bowl, combine the semi sweet chocolate chips and Nutella.
- Place the bowl over a saucepan of simmering water (double boiler method) or microwave in 30 second intervals, stirring between each, until the mixture is completely melted and glossy. Note: Patience here prevents the chocolate from "seizing" or burning.
- Remove from heat and stir in the sweetened condensed milk, vanilla extract, and sea salt until the mixture is thick and unified. Note: You will see it transform from a liquid to a heavy, fudge like paste almost instantly.
- Fold in the chopped toasted hazelnuts if using.
- Spread the mixture evenly into the prepared pan, smoothing the top with a silicone spatula.
- Refrigerate for at least 3 hours until firm and matte on the surface before lifting from the pan and slicing into 24 squares.
Chef's Tip: If you want an incredibly smooth top, dip your spatula in very hot water, wipe it dry, and run it over the surface of the fudge right after pouring. The residual heat will melt the very top layer just enough to fill in any gaps or ripples.
One thing I learned the hard way: don't rush the cooling. I once tried to stick a batch in the freezer to speed things up, and the rapid temperature change caused the fats to separate, leaving a weird white film on top. Let the fridge do its work slowly. If you're looking for other ways to use this flavor profile, my Heaven In A Bowl recipe uses a similar hazelnut mousse that pairs beautifully with these fudge squares if you're building a dessert platter.
Troubleshooting the Most Common Fudge Hurdles

Even with a simple nutella fudge recipe, things can sometimes go sideways. The most common issue people face is "seizing." This happens when a tiny drop of water gets into your melting chocolate, causing it to turn into a gritty, clumpy mess.
If you're using the double boiler method, make sure the bottom of your bowl isn't actually touching the simmering water; you only want the steam to heat the bowl.
Why Your Fudge Feels Oily
If you see beads of oil rising to the top as you stir, it usually means the mixture got too hot too fast. When chocolate and Nutella are overheated, the fats "break" away from the solids. You can sometimes save this by adding a teaspoon of room temperature condensed milk and stirring vigorously off the heat.
The extra sugar and moisture can help pull the emulsion back together.
Why Your Fudge Stays Soft
If it’s been in the fridge for 5 hours and still feels like thick frosting, you likely didn't have enough chocolate chips or used too much condensed milk. This is why using the 14 oz and 12 oz measurements exactly is so critical.
You can't really "re cook" this type of fudge, but you can transform it! If it's too soft to cut, roll it into balls and coat them in cocoa powder or crushed nuts to make "Fudge Truffles."
| Problem | Root Cause | Solution |
|---|---|---|
| Gritty texture | Chocolate overheated or "seized" | Melt chocolate slowly; never let water touch the mixture. |
| Sticky to cut | Knife is dragging through the fudge | Dip knife in hot water and wipe dry between every single cut. |
| Top is cracked | Fudge dried out in the fridge | Cover the pan with plastic wrap once it has cooled to room temperature. |
Common Mistakes Checklist:
- ✓ Always use a dry bowl and spatula (one drop of water can ruin the chocolate).
- ✓ Do not boil the condensed milk; it only needs to be stirred into the warm chocolate.
- ✓ Toast your hazelnuts before adding them; raw nuts will turn soggy inside the fudge.
- ✓ Use semi sweet chips, as milk chocolate doesn't have enough cocoa butter to set firmly with the Nutella.
Scaling the Recipe for Any Crowd
If you’re making this for a big party or as gifts for the whole office, doubling the recipe is very straightforward. You’ll want to move up to a 9x13 inch pan to keep the thickness consistent. When you double the ingredients, the melting process will take a bit longer.
If using a microwave, stick to 30 second intervals but expect to do 4-5 rounds instead of 2-3.
Scaling down is a bit trickier because half a can of condensed milk is annoying to store. However, if you do want a small batch, use 7 oz of condensed milk and 6 oz of chocolate chips.
Use a small loaf pan instead of the 8x8 to keep that signature "chunkiness." If you find yourself with leftover condensed milk, it’s brilliant stirred into coffee or used as a dip for strawberries.
| Goal | Pan Size | Ingredient Change | Cook Time Change |
|---|---|---|---|
| Small Batch (12 pc) | 9x5 Loaf Pan | Halve all ingredients | No change to intervals |
| Standard (24 pc) | 8x8 Square | Follow recipe | 5 minutes |
| Party Size (48 pc) | 9x13 Rect. | Double all ingredients | Increase melting by 3-4 mins |
Debunking Common Kitchen Myths
One big myth is that you need a candy thermometer for any "real" fudge. That’s only true for old-fashioned crystalline fudge where you’re boiling sugar to the "soft ball" stage. This recipe is a modern emulsion based fudge. We aren't creating a sugar structure; we are creating a fat and protein matrix.
So, put the thermometer away and trust your eyes once it’s glossy and unified, you’re done.
Another misconception is that "more Nutella is always better." I tried adding a full cup once, thinking I was a genius, but the fudge never set. The oils in the hazelnut spread are too soft.
You need the ratio of chocolate chips to be higher than the spread to ensure the fudge actually holds its shape at room temperature. Stick to the 0.5 cup measurement for the best structural integrity.
Keeping Your Sweet Treats Fresh
Storage is where most people lose the quality of their fudge. Chocolate is like a sponge for smells; if you put it in the fridge uncovered next to a cut onion, your fudge will taste like onion by tomorrow. Always store your squares in an airtight container.
- Fridge: It will stay velvety and fresh for up to 2 weeks. I actually think it tastes better on day three once the flavors have had time to "marry."
- Freezer: This fudge recipe freezes beautifully! Wrap the entire block or individual squares in parchment, then a layer of foil, then a freezer bag. It will last for 3 months. To eat, just let it sit on the counter for 15 minutes to take the chill off.
- Zero Waste Tip: If you have "crumbs" or small uneven edges from trimming your fudge, don't throw them away. Toss them into a blender with vanilla ice cream for the most incredible Nutella fudge milkshake you've ever had. You can also melt the scraps down and drizzle them over pancakes.
Three Ways to Plate Your Fudge
Depending on the occasion, you can present this dish in very different ways. The taste remains the same, but the "vibe" changes completely.
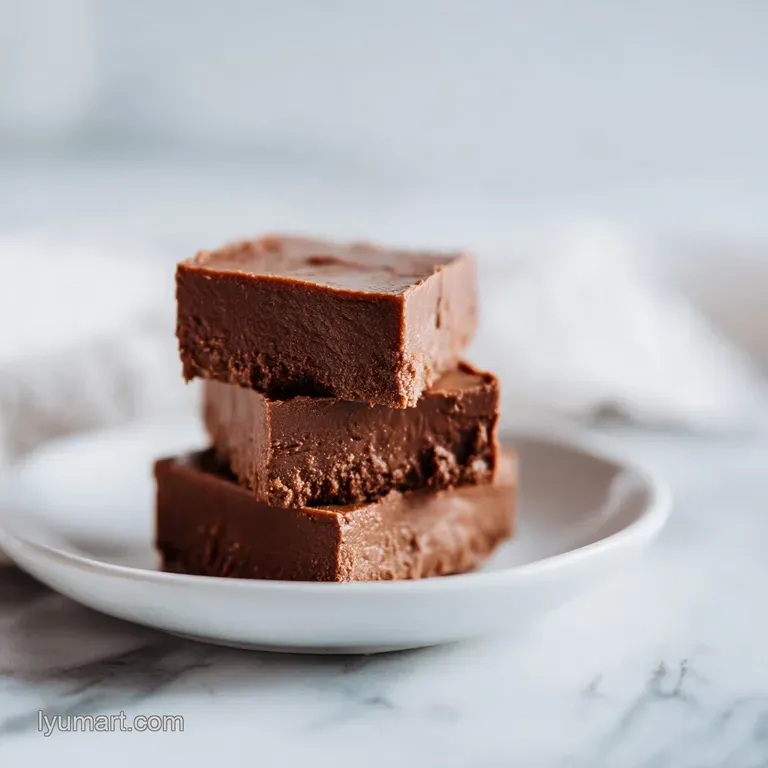
Simple Level: The Classic Grid
Cut the fudge into 24 even squares. Stack them in a pyramid on a wooden board or a white ceramic plate. This is great for a casual family get together where people can just grab a piece with their fingers. It feels rustic and approachable.
Polished Level: The Gift Box
Place each square into a small paper truffle liner (the kind used for cupcakes but smaller). Dust the tops with a tiny bit of high-quality cocoa powder or a single flake of Maldon sea salt. Arrange them in a single layer in a tin or a windowed box. This looks like something you bought from a professional chocolatier.
Restaurant Level: The Deconstructed Tart
Instead of a square, cut a long, thin rectangle. Place it slightly off center on a dark plate. Using a spoon, create a "swoosh" of raspberry coulis next to it. Top the fudge with a single gold leaf flake or a "dusting" of hazelnut flour. Add three whole toasted hazelnuts and a tiny sprig of mint.
| Feature | Simple | Polished | Restaurant |
|---|---|---|---|
| Cut Style | Standard 1.5" squares | Precise 1" cubes | Long 3" batons |
| Topping | None | Sea salt flakes | Gold leaf or Praline |
| Garnish | Napkin | Paper liners | Fruit coulis/Mint |
Inspiring Pairing Ideas
Since this fudge is quite rich and dense, it pairs beautifully with things that have high acidity or a bit of "fizz." A sharp espresso is the classic choice the bitterness of the coffee cuts right through the sweet hazelnut.
If you’re serving this at a dinner party, a small glass of Frangelico (hazelnut liqueur) or a late harvest Riesling works wonders.
For a non alcoholic pairing, try serving it with a side of tart raspberries or sliced Granny Smith apples. The crisp, sour notes of the fruit provide a refreshing break from the heavy chocolate.
If you're feeling adventurous, a glass of cold milk with a dash of cinnamon is a nostalgic way to enjoy a couple of squares before bed. Whatever you choose, remember that this fudge is the star of the show; keep the pairings simple so it can truly shine.

Recipe FAQs
Can you add Nutella to fudge?
Yes, it is the star ingredient. Adding Nutella to your chocolate base provides a smooth, hazelnut forward flavor profile that complements the semi sweet chips perfectly.
How long does Nutella fudge last?
Store in the refrigerator for up to two weeks. Keep the squares in an airtight container to prevent them from absorbing other food odors, or freeze them for up to three months.
What is millionaire fudge?
No, this is a common misconception. Millionaire fudge is an entirely different dessert that usually involves layers of caramel and shortbread, unlike this single layer, quick set Nutella fudge.
Can I mix Nutella and condensed milk?
Yes, they create a perfect, creamy emulsion. Mixing these with melted chocolate and vanilla creates a thick, uniform texture that firms up beautifully after three hours in the refrigerator.
How to avoid gritty or seized chocolate when melting?
Ensure the bottom of your bowl never touches the simmering water. Using only steam heat prevents the chocolate from overheating, a principle of mastering delicate emulsion that ensures your fudge remains silky and smooth rather than clumpy.
How to get clean slices from the finished fudge?
Use the parchment paper overhang as a handle to lift the entire block out. Run a sharp knife under hot water and wipe it dry between each cut to ensure every one of the 24 squares looks professional.
Is it true the fudge will set faster in the freezer?
No, this is a common misconception. While the freezer might make the edges firm, the center needs a consistent chill in the refrigerator for at least three hours to achieve the ideal, stable fudge texture.
Easy Nutella Fudge

Ingredients:
Instructions:
Nutrition Facts:
| Calories | 172 calories |
|---|---|
| Protein | 2.8 g |
| Fat | 9.2 g |
| Carbs | 21.8 g |
| Fiber | 1.2 g |
| Sugar | 19.5 g |
| Sodium | 48 mg |
