How to Cook Spaghetti Squash: Tender and Caramelized
- Time: Active 35 minutes, Passive 35 minutes, Total 70 minutes
- Flavor/Texture Hook: Nutty, caramelized edges with long, firm strands
- Perfect for: Low carb weeknight dinners or meal prep enthusiasts
When you are looking for that perfect finish, keep these three checkpoints in mind. First, the salt sweat must last exactly 20 minutes; anything less won't pull enough water out.
Second, the oven needs to be fully preheated to 200°C (400°F) before the tray goes in. Finally, the "done" cue is when the skin feels slightly givey and the flesh is easily pierced with a fork but doesn't turn to paste.
| Feature | Fast Method (Microwave) | Classic Method (Oven Rings) |
|---|---|---|
| Prep Style | Prick skin, cook whole | Slice rings, salt, and pat dry |
| Water Content | High (steamed in own juice) | Low (moisture evaporated) |
| Flavor Profile | Mild, squash forward | Deep, roasted, savory |
If you love the flavor profile of roasted garlic and herbs here, you might also enjoy my creamy garlic pasta which hits those same savory notes but with a more traditional noodle base.
The Simple Elements You Need
We don't need a pantry full of specialized ingredients for this. The beauty of this recipe is that it relies on basic staples to let the squash shine. Because we're being budget conscious, we're using olive oil for the roast and just a touch of butter at the very end for that velvety mouthfeel.
| Ingredient | Science Role | Pro Secret |
|---|---|---|
| Kosher Salt | Drawing out moisture | Use coarse salt to cover more surface area without over salting the interior. |
| Olive Oil | Heat conduction | Brushing all sides ensures even browning and prevents the skin from sticking. |
| Fresh Garlic | Aromatic depth | Mince it tiny so it clings to the strands instead of falling to the bottom. |
- 1 Large Spaghetti Squash: Look for one around 1.6 kg (3.5 lbs). It should feel heavy for its size and have a matte, pale yellow skin. Why this? Larger squashes tend to have more developed, thicker strands than the tiny ones.
- 2 tbsp Extra Virgin Olive Oil: Use a standard cooking grade oil here. Why this? It has a high enough smoke point for 200°C while adding healthy fats.
- 1.5 tsp Kosher Salt: This is for the sweating process and seasoning. Why this? Kosher salt flakes are easier to see and distribute than fine table salt.
- 0.5 tsp Black Pepper: Freshly cracked makes a world of difference.
- 1 tbsp Unsalted Butter: For finishing. Why this? Adds a rich, silky coating to the "noodles" that oil alone can't achieve.
- 1 Clove Garlic: Finely minced.
- 1 tsp Fresh Thyme: Or any woody herb like rosemary.
Essential Tools for Fast Prep
Working with winter squash can be a workout, but having the right tools makes it a five minute job instead of a twenty minute struggle. You don't need fancy gadgets, just a few reliable kitchen workhorses.
A sharp chef's knife is non negotiable. If your knife is dull, it will slip on the waxy skin of the squash. If you find the squash is rolling around on your cutting board, slice a tiny sliver off one side to create a flat, stable base.
You will also need a sturdy metal spoon I find a grapefruit spoon with serrated edges works wonders for scraping out the seeds quickly.
A wire rack set inside a rimmed baking sheet is the "secret weapon" for the sweating stage. It allows the water to drip away from the squash rather than letting the rings sit in a puddle.
If you don't have a rack, you can use a plate lined with several layers of paper towels, but you'll need to change the towels halfway through.
step-by-step Roasting Guide
- Prep the squash. Trim the stem and the very bottom off the squash using a sharp knife. Slice the squash crosswise into 3.8 cm (1.5 inch) thick rings. Note: Cutting rings is much safer and easier than trying to split the whole thing lengthwise.
- Clean the centers. Use a metal spoon to scrape out the seeds and pulp from the center of each ring. until the center is smooth and clean.
- The salt sweat. Generously sprinkle kosher salt over the flesh of each ring. Place them on a wire rack for 20 minutes until beads of water appear on the surface.
- Dry thoroughly. Pat the rings completely dry with a paper towel to remove the extracted water and excess salt. Note: This is the most important step for preventing sogginess.
- Season. Brush all sides of the rings with olive oil and sprinkle with black pepper.
- Arrange. Place rings on a parchment lined baking sheet, ensuring they do not overlap. Note: Overcrowding will cause the squash to steam rather than roast.
- Roast. Bake at 200°C (400°F) for 30–35 minutes until the edges are caramelized and the flesh is tender.
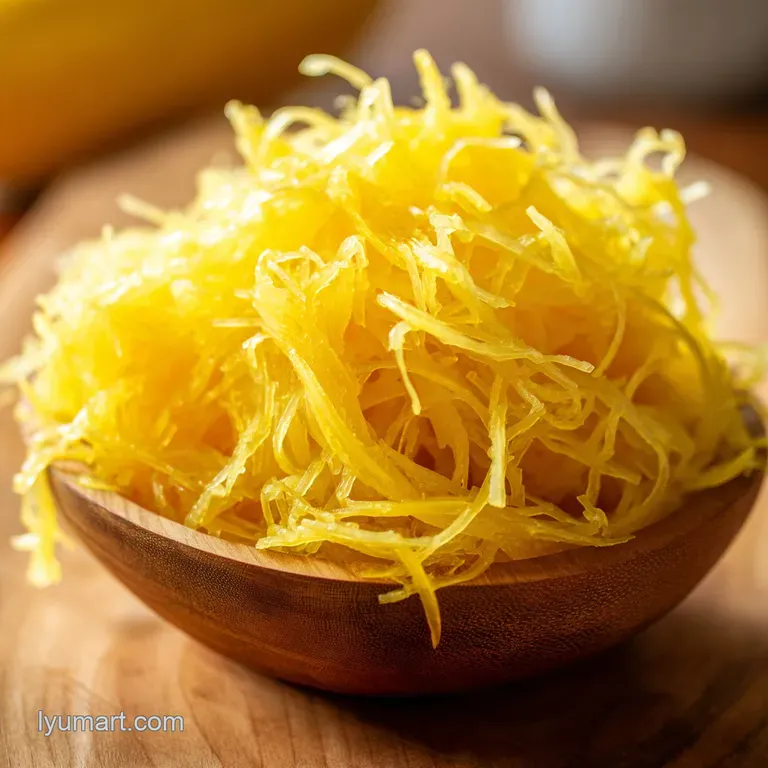
- Shred. Remove from oven, let cool slightly, and use a fork to pull the long strands away from the skin. until you have a pile of golden ribbons.
- Finish. Optional: Toss the warm strands with butter, minced garlic, and fresh thyme before serving.
How to Fix Common Mistakes

The most common complaint I hear about this dish is that it tastes "bland" or "wet." Usually, this comes down to skipping the salt step or not drying the squash enough. If you find your squash is still watery after roasting, it’s often because the rings were cut too thick, or the oven wasn't hot enough to evaporate the liquid.
Why Your Squash Is Watery
If you end up with a puddle on your plate, it’s likely that the moisture wasn't properly drawn out. The salt needs time to work its magic through osmosis. If you're in a rush and skip those 20 minutes, that water stays inside the cell walls and releases during the roast, essentially boiling the squash from the inside out.
| Problem | Root Cause | Solution |
|---|---|---|
| Mushy Strands | Overcooking or steaming | Reduce cook time by 5 mins; ensure rings don't touch on the pan. |
| Crunchy Center | Rings cut too thick | Ensure rings are no more than 4 cm thick for even heat penetration. |
| Lack of Flavor | Not enough browning | Increase oven temp to 210°C or roast for 5 extra minutes. |
Common Mistakes Checklist
- ✓ Always pat the squash dry after salting don't just rinse it!
- ✓ Use a wire rack for the "sweat" to let gravity help remove the water.
- ✓ Ensure the oven is fully preheated; a "cold start" leads to mushy texture.
- ✓ Don't skip the pepper; the squash needs that bite to balance its natural sweetness.
- ✓ Shred the strands while they are still warm so they absorb the butter and garlic better.
Creative Swaps and Healthy Variations
While garlic and thyme are my go to for a fast weeknight side, this squash is a total chameleon. It can handle big, bold flavors just as well as it handles simple butter. Because it's so affordable, I often experiment with whatever I have left in the fridge.
If you are looking for a more Mediterranean vibe, you can swap the butter for a splash of high-quality extra virgin olive oil and toss in some sun dried tomatoes and kalamata olives.
For those on a vegan diet, a tablespoon of nutritional yeast adds a cheesy, savory flavor that mimics parmesan beautifully without any dairy.
| Original Ingredient | Substitute | Why It Works |
|---|---|---|
| Unsalted Butter | Ghee | Higher smoke point and a deeper, toasted nut flavor. |
| Fresh Thyme | Dried Oregano | Stronger herbal punch. Note: Use half the amount as dried is more potent. |
| Garlic Clove | Garlic Powder | More even distribution. Note: Lacks the "bite" of fresh garlic. |
For a more substantial meal, serve this as a side to some parmesan garlic bread if you're looking for a fuller meal that the kids will actually eat.
Storage and Better Reheating Methods
Spaghetti squash is one of those rare vegetables that actually holds up quite well in the fridge. You can store the roasted strands in an airtight container for up to 4 days. I actually think the texture improves slightly after a night in the fridge because the strands firm up as they cool.
When it comes to reheating, avoid the microwave if you can. The microwave tends to make the strands go limp. Instead, toss them in a dry skillet over medium heat for 3-4 minutes. This will evaporate any condensation and bring back that slightly nutty, roasted flavor.
Zero Waste Tip: Don't throw away those seeds! You can roast them exactly like pumpkin seeds. Wash the pulp off, pat them dry, toss with a little oil and salt, and roast at 180°C for 10-12 minutes until they pop.
They make a crunchy, protein packed snack for the kids' lunchboxes.
Serving Ideas for Busy Families
This dish is remarkably versatile. For a fast weeknight dinner, I often top the strands with a hearty bolognese sauce or even just a jar of good marinara. It satisfies that pasta craving without the heavy, sleepy feeling that usually follows a big bowl of wheat noodles.
If you're serving this as a side dish, it pairs beautifully with roasted chicken or a pan seared steak. The sweetness of the squash balances out salty meats perfectly. Sometimes, I’ll even mix in some sautéed spinach and a handful of toasted pine nuts for a bit of crunch.
It’s a budget friendly way to fill up the plate with something nutritious that doesn't feel like "diet food."
One final trick: if you have leftovers, they make a fantastic base for a breakfast hash. Fry the strands in a pan with some chopped bacon or sausage until they get crispy bits on the edges, then crack an egg right on top. It’s an efficient, delicious way to use up every last bit of that squash.
Myths About Spaghetti Squash
One big misconception is that you have to cook it until it's "soft." In reality, spaghetti squash should have a slight "al dente" bite, much like real pasta. If you can mash it with a fork like a potato, you've gone too far. The goal is distinct, separate ribbons, not a puree.
Another myth is that the "boat" method (slicing it in half) is the only way to get the seeds out. As we've seen with the ring method, cleaning the seeds out of a circle is actually much faster because you can see exactly what you're doing from both sides.
It also ensures you don't leave any of those stringy "guts" behind which can make the final dish feel slimy.
Finally,, people often think you need to boil the squash first to "soften the skin" before cutting. Please don't do this! It’s dangerous and makes the squash slippery. A sharp knife and a stable cutting board are all you need to safely slice through even the toughest winter squash.
Trust the process, take your time with the cuts, and you'll be rewarded with the best "pasta" alternative you've ever tasted.

Recipe FAQs
What is the best method for cooking spaghetti squash?
Roasting crosswise rings is the superior technique. This method creates more surface area for caramelization and is significantly safer than wrestling a knife through a whole squash lengthwise.
What temperature does spaghetti squash need to be cooked at?
Roast the squash at 400°F (205°C). This temperature ensures the flesh becomes tender while developing a deep, nutty flavor on the caramelized edges.
Is spaghetti squash ok for gastritis?
Yes, it is generally considered a gentle, low-acid vegetable. Because it is soft once cooked and typically prepared with minimal, mild seasoning, it is often well tolerated in soothing diets.
Is spaghetti squash ok for diabetics?
Yes, it is an excellent low-glycemic alternative to pasta. The high water and fiber content helps minimize blood sugar spikes compared to traditional wheat based noodles.
How to avoid mushy spaghetti squash strands?
Salt the rings and let them rest on a wire rack for 20 minutes before baking. This process draws out excess moisture, ensuring the strands remain firm and distinct rather than watery.
How to reheat leftovers without ruining the texture?
Use a dry skillet over medium heat for 3-4 minutes. If you enjoyed mastering the high heat roast technique here, you will find that the same principle of moisture evaporation applies when pan-searing these strands to restore their firm, roasted texture.
How to get the longest strands possible?
Cut the squash into 1.5 inch thick crosswise rings. By slicing against the natural grain of the squash, you ensure that when you pull the strands with a fork, they remain long and spaghetti like instead of short and broken.
How To Cook Spaghetti Squash

Ingredients:
Instructions:
Nutrition Facts:
| Calories | 172 kcal |
|---|---|
| Protein | 1.8 g |
| Fat | 11.4 g |
| Carbs | 18.8 g |
| Fiber | 4.2 g |
| Sugar | 7.1 g |
| Sodium | 490 mg |
