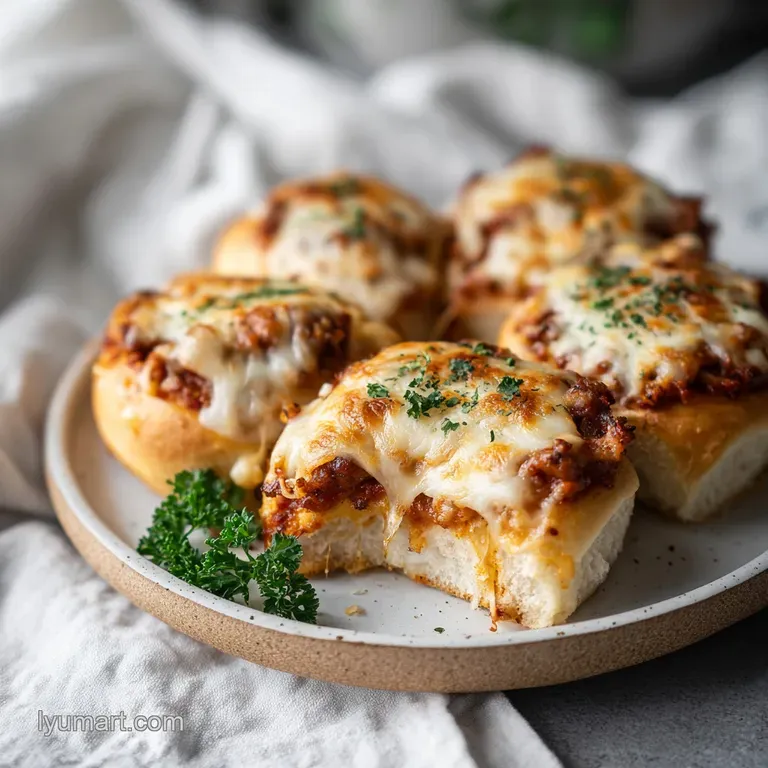
Pizza Sliders: Gooey and Pull Apart
- Time: Active 15 minutes, Passive 20 minutes, Total 35 minutes
- Flavor/Texture Hook: Shatter crisp buttery tops with a velvety mozzarella pull
- Perfect for: Game day crowds, budget-friendly family dinners, or beginner meal prep
- Making Easy Pull Apart Pizza Sliders
- Success Secrets for Golden Crusts
- Understanding the Slider Component Science
- Building Blocks for Savory Layers
- Essential Kitchen Gear Checklist
- Precise Cooking and Assembly Method
- Fixing Common Texture Issues
- Alternative Flavor Profiles
- Storing and Reheating Instructions
- Beautiful Plating and Serving
- Recipe FAQs
- 📝 Recipe Card
Making Easy Pull Apart Pizza Sliders
The humble slider has deep roots in American food culture, tracing back to the early 20th century when they were known simply as small, steam grilled burgers. Over the decades, they transformed from a quick Navy mess hall staple into the ultimate canvas for fusion cooking.
These Pizza Sliders represent that evolution perfectly, blending the sweet, pillowy tradition of Portuguese style Hawaiian rolls with the bold, herbaceous soul of an Italian American pizzeria.
Growing up, Friday nights meant a choice between ordering a pie or making something quick at home. I remember the first time I tried these at a neighborhood block party. The aroma of toasted garlic and smoked paprika hit me before I even saw the tray.
There is something incredibly communal about a tray of pull apart bread. It turns a meal into an event where everyone gathers around the warm baking dish, reaching for that corner piece with the most melted cheese.
We are going for a specific nostalgic comfort here. This is not about wood fired sourdough or artisanal toppings. It is about that satisfying, buttery crunch that only happens when melted light butter meets a hot oven.
It is about the way the turkey pepperoni provides a lean, salty bite without making the whole tray swim in grease. By the time the parmesan on top turns that specific shade of mahogany, you know you have something special.
Success Secrets for Golden Crusts
Success in the kitchen usually comes down to managing moisture and heat. With these sliders, the goal is to get the cheese fully melted in the center without burning the tops or leaving the bottom bun sitting in a puddle of sauce. We achieve this through a specific layering technique and a two stage baking process.
- The Cheese Shield: Placing a layer of mozzarella directly on the bottom bun creates a fat based barrier. This prevents the water in the marinara sauce from migrating into the bread fibers, which is the main cause of sogginess.
- Foil Steam Effect: Baking covered for the first 10 minutes traps the internal steam. This ensures the 6 oz of mozzarella melts into a velvety blanket before the exterior bread has a chance to dry out or brown too quickly.
- Sugar Caramelization: Hawaiian rolls have a higher sugar content than standard white rolls. This means they brown rapidly, so that final 10 minute uncovered stretch is where we watch for that deep mahogany color.
- Fat Distribution: Brushing the glaze in two stages ensures the herbs stick to the bread during the first half of baking, while the second brush adds a fresh hit of garlic flavor and moisture right before serving.
| Feature | Fast Slider Method | Classic Homemade Pizza |
|---|---|---|
| Active Prep | 15 minutes | 45 minutes (with dough) |
| Texture | Soft, pillowy, and buttery | Chewy, charred, and airy |
| Clean up | One baking dish and a bowl | Pizza stone, peel, and floured counters |
| Portability | High (stays warm in the tray) | Moderate (best eaten immediately) |
If you love the convenience of handheld meals but want something with a bit more "burger" flair, you might also enjoy this Pizza Burger Burger which uses similar flavor profiles in a heartier format. Both recipes rely on that perfect balance of melted cheese and savory sauce to hit the spot.
| Servings | Roll Count | Meat Adjustment | Recommended Pan |
|---|---|---|---|
| 6 People | 6 Rolls | 1.5 oz Pepperoni | 8x8 inch square |
| 12 People | 12 Rolls | 3 oz Pepperoni | 9x13 inch rectangular |
| 24 People | 24 Rolls | 6 oz Pepperoni | Two 9x13 inch pans |
Understanding the Slider Component Science
Every ingredient in this recipe serves a functional purpose beyond just flavor. Understanding how they interact helps you make smarter swaps without ruining the texture.
| Ingredient | Science Role | Pro Secret |
|---|---|---|
| Mozzarella | Structural binder and moisture barrier | Use thinly sliced part skim for a more even melt than thick shreds |
| Turkey Pepperoni | Lean protein with lower rendering point | Offers the same spice profile as pork with 70 percent less oil runoff |
| Light Butter | Heat conductor for the glaze | Melting it first allows the garlic powder and herbs to suspend evenly |
| Smoked Paprika | Color and depth enhancer | Adds a "fired oven" flavor note without needing a grill or smoker |
Using the right fat content is crucial. Many people assume regular pepperoni is better, but the high fat content in traditional pepperoni can actually saturate the Hawaiian rolls during the 20 minute bake. Turkey pepperoni stays firm and savory without the greasy mess.
Building Blocks for Savory Layers
To get the best results, you need the right ratio of sauce to bread. Overloading the marinara is a common mistake that leads to a "wet" slider. Stick to the 1/4 cup measurement for a clean, handheld experience.
- 1 pack (12 count) Savory Butter or Whole Wheat Hawaiian Rolls: Why this? They provide a sturdy, sweet base that contrasts the salty toppings.
- 6 oz part skim mozzarella cheese: Why this? Lower fat content ensures a "clean" melt without excessive oil separation.
- 1/4 cup low sodium marinara sauce: Why this? Provides moisture and acidity without making the rolls soggy.
- 3 oz turkey pepperoni slices: Why this? Provides a lean, peppery bite that holds its shape during baking.
- 2 tbsp freshly grated Parmesan cheese: Why this? Adds a salty, umami crust to the top bun.
- Glaze Components: 2 tbsp light butter, 1 tsp garlic powder, 1 tsp dried Italian seasoning, 1/4 tsp smoked paprika, 1/2 tsp red pepper flakes.
| Original Ingredient | Substitute | Why It Works |
|---|---|---|
| Hawaiian Rolls | Brioche Slider Buns | Similar high egg/butter content for a rich, soft texture |
| Mozzarella | Provolone (mild) | Excellent melting properties with a slightly sharper finish |
| Turkey Pepperoni | Thinly Sliced Salami | Same cured meat profile. Note: Slightly higher fat content |
| Marinara Sauce | Pesto | Same moisture level but shifts flavor to herbaceous and nutty |
Essential Kitchen Gear Checklist

You do not need a professional kitchen to make these, but two specific tools make a massive difference in the final quality.
First, a long serrated knife is non negotiable. Using a straight edge blade will squash the soft rolls, making them gummy. You want to "saw" through the middle of the slab in one clean motion. Second, a 9x13 inch baking dish (like a Pyrex or ceramic baker) is the ideal size.
It keeps the rolls huddled together, which forces the steam upward through the cheese rather than out the sides.
A pastry brush is also helpful for even glaze distribution. If you don't have one, the back of a spoon works, but you might end up with "hot spots" of garlic powder. Using a small whisk to combine the melted butter and spices ensures that every inch of the mahogany crust gets an equal share of the seasoning.
Precise Cooking and Assembly Method
- Slice the rolls. Keep the rolls connected in their slab form. Use a serrated knife to cut through the entire middle horizontally. Note: This creates a single top "lid" and a bottom "base" for faster assembly.
- Prepare the dish. Place the bottom half of the rolls into your 9x13 inch baking dish. Don't worry if they fit snugly; that helps with the pull apart effect.
- Create the shield. Layer exactly half of the mozzarella slices (3 oz) across the bottom rolls. until the bread is completely covered.
- Add meat layers. Place the turkey pepperoni slices in an even layer over the cheese.
- Sauce the center. Spread the 1/4 cup of marinara thinly over the pepperoni. Note: Keeping the sauce in the middle of the meat and cheese protects the bread.
- Top it off. Add the remaining mozzarella over the sauce, then place the top bun slab back on.
- Whisk the glaze. Combine the melted light butter, garlic powder, Italian seasoning, and smoked paprika in a small bowl.
- First glaze phase. Brush exactly half of the butter mixture over the tops. Cover the dish tightly with foil.
- The steam bake. Bake at 350°F (175°C) for 10 minutes until the cheese begins to soften and slump.
- The crisping phase. Remove the foil. Brush with the remaining glaze and sprinkle with Parmesan and red pepper flakes. Bake for another 10 minutes until the tops are deep mahogany and the cheese is bubbling.
Fixing Common Texture Issues
Sometimes things go sideways in the oven. The most common complaint is a slider that is too crunchy on top but cold in the middle. This usually happens if the oven isn't calibrated or if the rolls were used straight from the freezer.
The Bottom is Too Soft
If your sliders feel "doughy" on the bottom, it is likely because too much sauce was used or the cheese barrier was incomplete. Make sure the cheese covers every corner of the bottom bun before adding any sauce.
| Problem | Root Cause | Solution |
|---|---|---|
| Burnt Tops | Sugar in rolls browning too fast | Tent with foil sooner and lower the rack in the oven |
| Cold Center | Rolls were refrigerated/frozen | Increase the covered baking time by 5 minutes |
| Dry Sliders | Not enough glaze or over baked | Apply a final brush of butter immediately after removing from oven |
Common Mistakes Checklist:
- ✓ Never pull the rolls apart before slicing; keep them in a solid slab for evenness.
- ✓ Pat the pepperoni dry with a paper towel if you see any moisture in the bag.
- ✓ Use a thermometer to ensure your oven is truly at 350°F before the tray goes in.
- ✓ Don't skip the foil step; it's the only way to melt the cheese without turning the bread into a crouton.
- ✓ Let the tray rest for 3 minutes after baking so the cheese can "set" before you pull them apart.
Alternative Flavor Profiles
Once you have the base method down, you can swap the "Pizza" vibe for other profiles. This technique works for almost any small sandwich.
For a "Veggie Supreme" version, swap the pepperoni for very thinly sliced bell peppers and mushrooms. The key here is to sauté the vegetables first to cook off their water content. If you put raw veggies in the sliders, they will release steam and make the bread soggy.
If you want a "White Pizza" version, replace the marinara with a thin layer of ricotta cheese or a garlic alfredo sauce. This creates a much creamier, richer slider. You can also mix up the rolls. Using Whole Wheat Hawaiian rolls adds a nutty depth that pairs beautifully with the smoked paprika in the glaze.
Storing and Reheating Instructions
These sliders are surprisingly resilient. You can store leftovers in the fridge for up to 3 days. The key is to keep them in an airtight container so the bread doesn't pick up "fridge smells."
For freezing, wrap individual sliders in foil and place them in a freezer bag. They will stay fresh for up to 2 months. To reheat, do not use the microwave if you want to keep the crunch. Microwaving makes the bread rubbery.
Instead, wrap them in foil and pop them into a 350°F oven for 10 minutes. If they are frozen, give them about 15-20 minutes.
Zero Waste Tip: If you have leftover marinara sauce, don't toss it! Use it as a dipping sauce for the sliders. If you have leftover pepperoni, chop it up and toss it into a morning omelet or a salad for a quick protein boost.
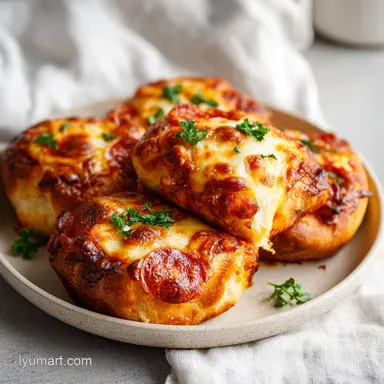
Beautiful Plating and Serving
To get that "wow" factor, don't just serve these straight from the baking dish if you are at a party. Use a wide spatula to lift the entire slab out onto a wooden cutting board. This allows people to see the layers and the mahogany crust from the side.
Scatter some fresh parsley or chopped basil over the top right before serving. The green pop against the red and gold of the sliders makes the dish look much more high end than its budget friendly ingredients suggest. To round out the meal with a satisfying crunch, pair these with Crispy Garlic Fries. The garlic in the fries mirrors the garlic in the slider glaze, creating a cohesive flavor profile that feels like a complete tavern meal.
| Feature | Pizza Sliders | Traditional Mini Pizza |
|---|---|---|
| Ease of Eating | One handed, no mess | Can be floppy or messy |
| Crowd Rating | Always the first dish finished | Requires constant assembly |
| Cost Per Serving | Roughly $1.20 | Roughly $2.50 |
Scaling for Large Parties
When doubling this recipe for a crowd, the math is simple because Hawaiian rolls come in standard 12 packs. If you are making 24 or 36 sliders, do not try to crowd them all into one pan. Use two separate 9x13 inch dishes.
This ensures the hot air can circulate around the sides of each slab, giving you more "crispy edges," which everyone knows are the best part. For the spices, you don't need to double the red pepper flakes stay at 1.5x the original amount unless your crowd loves serious heat.
Debunking Kitchen Myths
One common myth is that you need to cook the pepperoni before putting it in the slider. While this is true for some very greasy pork pepperonis, it is unnecessary for turkey pepperoni.
The 20 minute bake time at 350°F is more than enough to crisp the edges of the meat and release its oils into the cheese.
Another misconception is that more sauce equals more flavor. In reality, more sauce equals more steam, which ruins the structural integrity of the roll. The flavor comes from the concentrated spices in the butter glaze and the quality of the Parmesan cheese on top, not the volume of marinara.
Trust the 1/4 cup measurement it's the sweet spot for balance.

Recipe FAQs
How to slice the Hawaiian rolls for sliders?
Use a long serrated knife to cut the entire slab horizontally. Keep the rolls connected to maintain their structural integrity while creating a uniform top lid and bottom base.
Why is a moisture barrier important when assembling?
Layering half the mozzarella directly onto the bottom buns prevents the marinara from making the bread soggy. If you enjoyed mastering this barrier technique, see how we use similar principles to manage vegetable water content in our Crispy Cabbage Burger Bake.
How to ensure the crust reaches a deep mahogany color?
Bake uncovered for the final 10 minutes after removing the foil. This allows the heat to directly toast the herb glazed top, creating the desired color and texture.
Is it true I can microwave leftovers for a quick snack?
No, this is a common misconception. Microwaving turns the bread rubbery, so you should always use a 350°F oven for 10 minutes to maintain the intended crunch.
How to prevent the sliders from drying out in the fridge?
Seal them in an airtight container immediately after cooling. This prevents the bread from drying out or absorbing unwanted scents from the refrigerator environment.
How to reheat frozen pizza sliders?
Wrap the frozen sliders in foil and heat them in a 350°F oven. Allow approximately 15 to 20 minutes for them to warm through completely without compromising the texture.
How to apply the herb glaze for maximum flavor?
Brush half the mixture before the initial bake and the remainder before the final browning. This two-step process keeps the top moist during the steaming phase and adds a fresh, aromatic hit of garlic and Italian seasoning at the end.
Oven Baked Pizza Sliders
Ingredients:
Instructions:
Nutrition Facts:
| Calories | 144 calories |
|---|---|
| Protein | 7.9 g |
| Fat | 6.1 g |
| Carbs | 15.8 g |
| Fiber | 0.8 g |
| Sugar | 3.2 g |
| Sodium | 358 mg |
