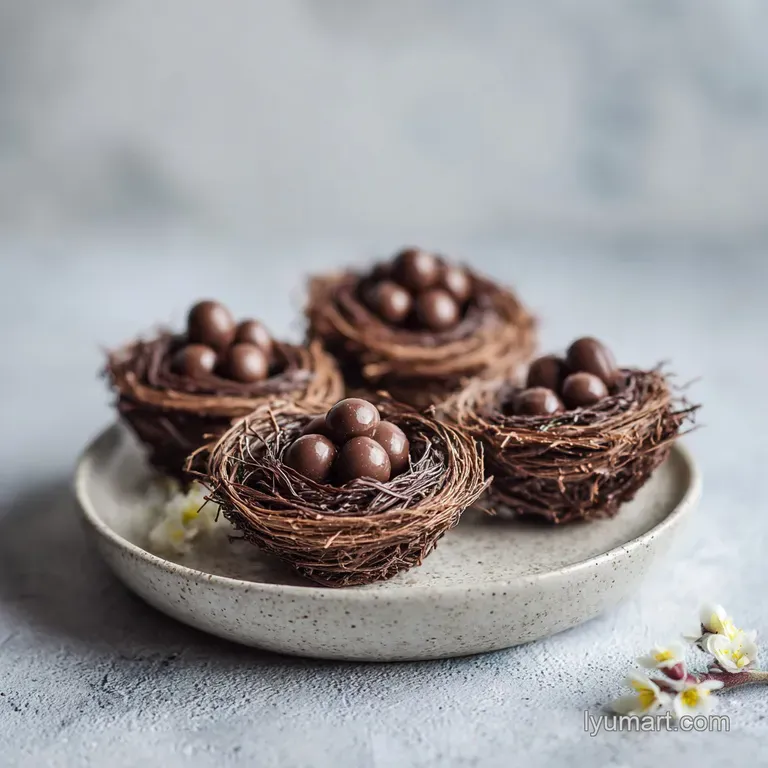
Chocolate Birds Nests: Crunchy and Nutty Treats

- Time: Active 15 minutes, Passive 30 minutes, Total 45 minutes
- Flavor/Texture Hook: A satisfying, brittle shatter paired with a smooth, nutty chocolate coating.
- Perfect for: Easter celebrations, kid friendly kitchen projects, and charming dessert table displays.
- Master These Chocolate Birds Nests
- Essential Specs and Preparation Time
- Selecting the Best Sweet Components
- Minimum Equipment for Maximum Results
- Assembling the Perfect Easter Treat
- Solving Common Texture Issues Quickly
- Customizing Flavors and Easy Swaps
- Smart Storage and Leftover Ideas
- Pairing With Other Sweet Treats
- Myths About Working With Chocolate
- Recipe FAQs
- 📝 Recipe Card
Master These Chocolate Birds Nests
Forget the notion that professional looking Easter bird nest cookies require a degree in pastry arts or a kitchen full of silicon molds. Most people assume you need to master the art of tempering chocolate to get that glossy, shelf stable finish, but that’s a total myth for home treats like this.
I used to stress over the "bloom" and the snap, but honestly, the magic happens in the simple mix of fats and textures. You don't need a thermometer or a marble slab, just a bowl and a little patience while things set.
The first time I made these, I was convinced they’d be a soggy mess. I thought the cereal would turn into a pile of damp mush the second it hit the warm chocolate. But when I took that first bite, the sound was a distinct, high pitched shatter. It was surprisingly light, not heavy or cloying.
We’re using shredded wheat to mimic the look of real twigs, and when that brittle cereal meets the velvety peanut butter mixture, it creates a structural masterpiece that holds its shape while staying airy.
We're going for a specific look here, something that feels a bit more "nature inspired" than a standard cookie. It’s about that rustic, slightly messy aesthetic that actually looks better when it’s not perfect. So, let your "twigs" stick out a little. Let the chocolate pool slightly in the bottom.
That’s where the flavor lives, and it’s what makes this version of Chocolate Birds Nests stand out from the ones you’d buy at a grocery store. It’s homemade magic that tastes far more expensive than it actually is.
Essential Specs and Preparation Time
Before we get our hands messy, we need to talk about the logistics. This isn't a project that will eat up your entire Saturday, but timing is everything if you want that crunch to stay pristine. We are looking at exactly 15 minutes of hands on work.
That includes the breaking of the cereal, the melting of the chocolate, and the final assembly. The rest of the time that 30 minutes of "cooking" is actually just waiting for the structure to firm up.
The Set Point: The structure relies on the chocolate and butter returning to a solid state. If you try to move them too early, the nests will slump into flat puddles. I’ve found that 30 minutes in the fridge is the sweet spot.
Any longer and the chocolate can get a bit too hard to bite through comfortably, any shorter and you’ll have a structural collapse on your hands.
| Method | Total Time | Texture Outcome | Best For |
|---|---|---|---|
| Room Temp Set | 1 hours 30 mins | Softer, creamier bite | Immediate eating |
| Fridge Chill | 45 minutes | Snappy, firm structure | Gifting or transport |
| Freezer Flash | 20 minutes | Very brittle, icy | Last minute cravings |
Choosing your setting method depends on your environment. If your kitchen is warm, don't even bother with the counter; go straight to the fridge. The contrast between the cold air and the warm fats is what creates that quick setting bond that keeps the "twigs" in place.
Selecting the Best Sweet Components
The ingredient list for Chocolate Birds Nests is short, which means every single item has a massive job to do. We aren't just looking for sweetness; we are looking for tension and stability. The fats in the peanut butter and the butter itself are there to prevent the chocolate from becoming too brittle.
Pure chocolate, once melted and reset, can be quite hard. Adding these fats ensures a "velvety" mouthfeel that yields easily when you take a bite.
Fat Integration: The peanut butter acts as a secondary binder that adds a matte finish and a hint of saltiness. This prevents the nests from being one dimensional and sugary.
When you mix the 12 oz milk or dark chocolate chips with that half cup of peanut butter, you’re creating an emulsion that is far more stable at room temperature than plain chocolate chips would be on their own.
| Ingredient | Science Role | Pro Secret |
|---|---|---|
| Chocolate Chips | Primary structural binder | Use a mix of 50% dark and 50% milk for depth |
| Peanut Butter | Lowers the snap point | Choose "creamy" to avoid unwanted lumps in the "twigs" |
| Shredded Wheat | Structural scaffolding | Don't crush it into dust; keep 1 inch lengths |
| Unsalted Butter | Adds gloss and shine | Use cold butter to slow down the initial melt |
The Twig Base Cereal
The shredded wheat is the unsung hero of this recipe. Unlike cornflakes or rice puffs, shredded wheat has a fibrous, linear texture that perfectly mimics the look of a real bird's nest. When you break the biscuits apart, you get these long, thin strands.
You want to be gentle here if you pulverize the cereal, you lose the "nest" look and end up with something that looks more like a chocolate truffle. Aim for those 1 inch pieces to maintain the illusion.
Choosing Your Chocolate Blend
While the recipe calls for 12 oz of chips, the specific type you choose changes the whole vibe. Milk chocolate is traditional and kid friendly, but a dark chocolate version feels much more sophisticated. If you're looking for a rich, deep flavor, try using a high-quality velvety chocolate syrup as a drizzle over the finished nests to add another layer of cocoa intensity. The salt in the recipe is also non negotiable; it cuts through the fat and makes the chocolate flavor "pop."
Minimum Equipment for Maximum Results
One of the reasons I love this recipe is that it doesn't require a standing mixer or a heavy duty oven. It's a "bowl and spoon" kind of afternoon. However, the quality of your bowl matters. I always suggest using a large heat proof glass or stainless steel bowl.
Plastic bowls can sometimes retain odors or oils that might interfere with the chocolate’s ability to set properly.
A rubber spatula is your best friend here. You need to be able to scrape the bottom of the bowl to ensure every single strand of shredded wheat is coated. If you leave dry spots, those parts of the nest will eventually fall off, leaving you with a "balding" nest. Also, grab two large spoons for portioning.
This is much cleaner than trying to use your hands, which will just melt the chocolate and leave you with a sticky mess.
Using a muffin tin is a great "cheat" for keeping the nests uniform, but if you want that truly rustic, natural look, just use a flat baking sheet lined with parchment paper. This allows the nests to spread out a little and look more like something you'd find in a tree.
The parchment paper is vital; without it, the chocolate will bond to the metal, and you'll have to chisel your nests off, likely breaking them in the process.
Assembling the Perfect Easter Treat
- Break the cereal. Gently pull apart the 4 cups of shredded wheat biscuits into a large bowl. Aim for 1 inch lengths. Note: This size provides the best structural integrity.
- Season the base. Sprinkle a pinch of fine sea salt over the cereal. Note: Salt enhances the chocolate's natural profile.
- Combine the melt. Add 12 oz chocolate chips, 0.5 cup peanut butter, and 1 tbsp unsalted butter into a heat proof bowl.
- Melt the mixture. Heat in the microwave for 30 second bursts, stirring in between. Stop when the mixture is smooth and glossy.
- Coat the "twigs." Pour the chocolate mixture over the shredded wheat. Note: Work quickly before the chocolate begins to cool and thicken.
- Fold gently. Use a spatula to turn the cereal until every piece is brown and fully coated.
- Portion the nests. Use two spoons to drop 12 large mounds onto your prepared parchment paper.
- Shape the centers. Use the back of a spoon to press a hollow into the middle of each mound. Ensure the edges stay raised and "twiggy".
- Add the eggs. Place three candy coated chocolate eggs into each center. Note: Pressing them in slightly helps them stay put once set.
- Set the structure. Chill in the refrigerator for 30 minutes until the chocolate is firm to the touch.
The Secret Garnish Strategy
To make these nests truly "presentation ready," we need to think about color balance. The brown of the chocolate is a neutral base, so your eggs need to provide the "pop." I recommend using a mix of three specific colors to create a balanced look.
Start with a Pastel Blue egg to represent a classic robin's egg. It adds a sense of calm and authenticity. Next, add a Sunny Yellow egg to bring a splash of brightness that mimics spring sunshine. Finally, finish with a Pale Pink egg to soften the palette.
This trio creates a visual triangle that is naturally pleasing to the eye. For an extra touch of "magic," you can add a tiny dusting of powdered sugar over the top to look like a light spring frost, but do this only right before serving so it doesn't dissolve.
Solving Common Texture Issues Quickly
Even with a simple recipe, things can go sideways. The most common heartbreak with Chocolate Birds Nests is the "slump." This happens when the chocolate mixture is too thin or the cereal is broken down too small. If your nests look more like cookies than nests, it’s usually a temperature issue.
The chocolate needs to be thick enough to hold the cereal together but fluid enough to coat it.
If your chocolate seizes turning from a smooth liquid into a grainy, clumpy mess it’s usually because a tiny drop of water got into the bowl. Chocolate and water are enemies.
To fix this, you can sometimes save it by stirring in a teaspoon of neutral oil or a bit more melted butter, but prevention is always better. Ensure your bowl and spatula are bone dry before you start.
| Problem | Root Cause | Solution |
|---|---|---|
| Nests Falling Apart | Not enough binder/too much cereal | Melt 2 oz more chocolate and drizzle over the nests |
| Grainy Chocolate | Overheating or water contamination | Stir in 1 tsp of vegetable oil immediately |
| Soggy Cereal | Coating the cereal while chocolate is boiling hot | Let chocolate cool for 2 minutes before pouring |
Common Mistakes Checklist
- ✓ Avoid using "natural" peanut butter where the oil separates; it's too unstable for this structure.
- ✓ Never skip the salt; it's the difference between a "flat" sweet and a complex dessert.
- ✓ Don't over mix once the chocolate is on the cereal; you'll break the "twigs" into crumbs.
- ✓ Ensure the candy eggs are added while the chocolate is still tacky so they "glue" into place.
- ✓ Check your fridge space before you start scooping so you aren't stuck with a tray and nowhere to put it.
Customizing Flavors and Easy Swaps
If you want to move away from the classic milk chocolate, there are plenty of ways to pivot. A white chocolate version is stunning, especially if you add a drop of green food coloring to the mix to make it look like mossy grass.
However, keep in mind that white chocolate has a lower melting point and contains no cocoa solids, so it sets much softer. You might want to increase the shredded wheat by half a cup to compensate for the extra fluidity.
For those with nut allergies, you can easily swap the peanut butter for sunflower seed butter. It has a similar fat content and provides that necessary "velvety" texture without the allergen risk. The flavor is slightly more earthy, which actually pairs quite well with dark chocolate. If you're feeling adventurous, you could even use the base of this recipe and layer it into a Heaven In A Bowl for a textured Easter trifle.
| Original Ingredient | Substitute | Why It Works |
|---|---|---|
| Peanut Butter | Biscoff Cookie Butter | Similar viscosity. Note: Makes the nests much sweeter and adds spice notes. |
| Shredded Wheat | Chow Mein Noodles | Provides a very salty, crunchy "twig." Note: Texture is denser and more brittle. |
| Milk Chocolate | White Chocolate | Same melting method. Note: Very sweet; best paired with tart candy eggs. |
Smart Storage and Leftover Ideas
These nests are surprisingly hardy. Because they aren't baked, they don't go "stale" in the traditional sense, but the cereal can lose its shatter crisp texture if exposed to humidity. I always recommend an airtight container. At room temperature, they’ll stay perfect for about 3 to 5 days.
If you keep them in the fridge, they’ll last up to 2 weeks, but the chocolate might develop a slight white "bloom" from the moisture. It’s perfectly safe to eat, just not as pretty.
If you find yourself with extra shredded wheat crumbs at the bottom of the bag, don't throw them out! Toast them in a pan with a little butter and sugar, and you have a fantastic crunchy topping for yogurt or ice cream.
Zero waste in the kitchen is always the goal, and those "twig" scraps are basically pre made granola.
You can also freeze these for up to 3 months. Just make sure to wrap them individually in plastic wrap before putting them in a freezer bag. When you're ready to eat, let them thaw in the fridge overnight. Thawing them on the counter can cause condensation to form on the chocolate, making it sticky.
Pairing With Other Sweet Treats
When you're building a dessert table, these Chocolate Birds Nests are the perfect "anchor" piece because of their height and texture. They pair beautifully with softer, creamier desserts.
Think of a lemon tart or a light chiffon cake; the "snap" of the nest provides a necessary contrast to the "velvety" crumb of a cake.
If you're going for an all out chocolate theme, serve these alongside some fresh strawberries. The acidity of the fruit cuts right through the richness of the peanut butter binder. You could even serve them with a small pitcher of milk on the side it’s a classic pairing for a reason.
These nests aren't just for Easter, either. Swap the chocolate eggs for red and green M&Ms, and suddenly you have "Christmas Wreaths." Change the eggs for jelly beans, and they're "Summer Garden" treats. The versatility is what makes them a staple in my kitchen.
Myths About Working With Chocolate
One big misconception is that you need a double boiler to melt chocolate safely. While it's the "chef approved" way, the microwave is perfectly fine if you're careful. The myth is that the microwave "burns" chocolate instantly. In reality, chocolate only burns if you leave it in for too long without stirring.
Stirring distributes the heat; often, the chips will look solid but melt completely once you start moving them around with your spatula.
Another myth is that you can't use "cheap" chocolate chips for these. Actually, for a no bake treat like this, standard grocery store chips are often better because they contain stabilizers that help the nests hold their shape in varying temperatures.
Expensive couverture chocolate is lovely, but it’s much more temperamental and can melt just from the heat of your fingers. Stick to the basics for these nests, and let the texture of the cereal do the heavy lifting!

Recipe FAQs
Is it true I have to use a double boiler to melt the chocolate?
No, this is a common misconception. You can achieve a smooth, glossy finish by melting the chocolate chips, peanut butter, and butter in the microwave using 30-second intervals and stirring between each.
How to prevent the nests from breaking apart?
Avoid using natural peanut butter with separated oils. The oil in these brands is too unstable to hold the structure together, unlike the creamy peanut butter specified in the ingredients.
Can I stir the mixture vigorously once the chocolate is added?
No, fold the mixture gently. If you over mix, you will crush the shredded wheat into crumbs, ruining the twig like texture of your nests.
How to get the candy eggs to stay in the center?
Press the eggs into the nests while the chocolate is still tacky. Placing them into the center indentation immediately after scooping acts like glue as the chocolate cools and sets.
Why is that pinch of sea salt included?
It provides essential flavor contrast. Skipping the salt leads to a flat, overly sweet dessert, whereas it elevates the chocolate and peanut butter profile. If you enjoyed learning how to balance these flavors, see how we apply similar techniques in our crunchy snack recipe.
How to store the nests if I am not serving them immediately?
Keep them in an airtight container in the refrigerator. Ensuring they are fully chilled for 30 minutes until firm is critical for maintaining their shape before storage.
Do I need to grease the parchment paper?
No, the parchment paper is sufficient to prevent sticking. Simply lining your baking sheet or muffin tin with the paper makes it easy to lift the set nests once they are firm.
Chocolate Birds Nests
Ingredients:
Instructions:
Nutrition Facts:
| Calories | 297 kcal |
|---|---|
| Protein | 5.4g |
| Fat | 16.3g |
| Carbs | 36.3g |
| Fiber | 3.0g |
| Sugar | 21.7g |
| Sodium | 94mg |
