Delicious Creamy Coconut Cake: Velvety and Moist
- Time: 35 min active + 4 hours chilling = Total 4 hours 55 mins
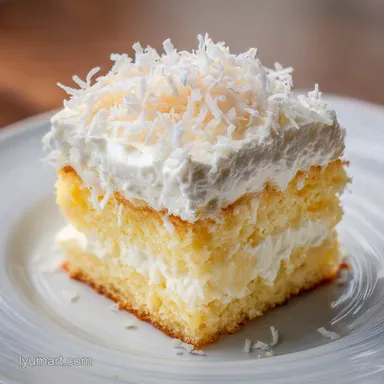
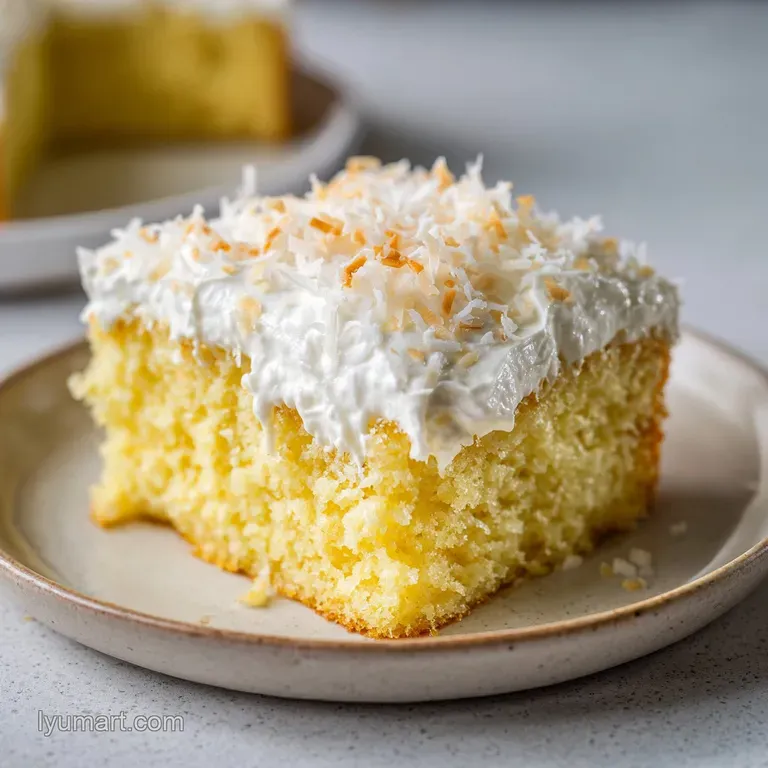
- Flavor/Texture Hook: Velvety, moist sponge with a toasted coconut shatter on top
- Perfect for: Family reunions, summer potlucks, or a crowd-pleasing holiday dessert
- Secrets for a delicious creamy coconut cake
- Crucial recipe specifications
- Ingredient breakdown and science
- Necessary kitchen tools
- The Cooking Process
- Fixing common cake mistakes
- Troubleshooting Common Issues
- Creative ways to vary
- Adjusting the Yield
- Coconut Cake Truths
- Keeping your cake fresh
- The best flavor pairings
- Recipe FAQs
- 📝 Recipe Card
I can still smell the toasted coconut in my kitchen from the last time I made this. There's something about that nutty, golden aroma hitting the air that just feels like a vacation, even if I'm just standing in my pajamas in the suburbs. The first time I tried a poke cake, I was skeptical.
I thought it would just be a soggy mess, but the first bite was a total shift in perspective. It wasn't just a cake, it was more like a chilled dessert hybrid that melted in my mouth.
I remember bringing this to a family gathering a few years back. My aunt, who usually hates anything "too sweet," took one piece and then quietly came back for a second and third. She told me it tasted like the fancy cakes from those old Southern bakeries. That's the magic of this delicious creamy coconut cake.
It takes a simple base and transforms it into something that feels intentional and sophisticated, without requiring you to spend six hours in the kitchen.
You're going to love how the textures play against each other here. You've got the soft, moist cake, the silky smooth coconut soak, and then that final hit of toasted coconut that adds a little bit of crunch. It's the kind of dessert that looks impressive on a platter but is honestly quite forgiving to make.
Let's crack on and get this in the oven.
Secrets for a delicious creamy coconut cake
Since we're using a cake mix as our foundation, the real magic happens in how we handle the infusion and the temperature. This isn't just about layering frosting, it's about changing the cellular structure of the cake.
By poking holes while the sponge is still warm, we're creating channels for the liquid to travel deep into the center.
Liquid Absorption: Warm cake cells are more open, allowing the coconut mixture to penetrate fully rather than just sitting on top.
Fat Synergy: Combining the fats from the cream of coconut and the condensed milk creates a stable, velvety emulsion that doesn't separate during the chilling process.
Temperature Contrast: Chilling the cake for 4 hours allows the starches to set around the liquid, which is why it feels creamy instead of wet.
Texture Layering: Toasting the coconut shreds separately ensures they don't soften in the frosting, giving you that necessary "shatter" effect.
| Method | Prep Time | Texture | Best For |
|---|---|---|---|
| Fast (Mix) | 35 minutes | Consistent, soft | Quick parties, beginners |
| Classic (Scratch) | 90 minutes | Denser, buttery | Special events, purists |
Crucial recipe specifications
When you're making a delicious creamy coconut cake, precision is your best friend, especially with the chilling time. If you rush the fridge stage, the coconut soak won't set, and you'll end up with a frosting that slides right off the top.
I've found that three specific checkpoints are non negotiable for this recipe. First, your batter must be smooth and glossy, with no streaks of oil or egg. Second, the toothpick test is vital, the center must come out completely clean. Third, the 4 hour chill is a hard rule, not a suggestion.
If you're in a rush, you can try the freezer for 1 hour, but the fridge is where the texture truly develops.
For those who enjoy exploring how ingredients interact, I often look at King Arthur Baking to understand how different fats affect crumb structure. In this case, the oil in the mix keeps the cake moist even after it's been refrigerated, which is why we don't use butter in the base.
Ingredient breakdown and science
The secret to this cake isn't just the coconut, it's the way the sugars and fats interact to create that signature "creaminess."
| Ingredient | Science Role | Pro Secret |
|---|---|---|
| Yellow Cake Mix | Structural Base | Sift it first to avoid tiny flour clumps |
| Cream of Coconut | Emulsified Fat | Use a brand with high coconut solids for thickness |
| Condensed Milk | Sugar/Binding | Provides the "velvety" mouthfeel and sweetness |
| Toasted Coconut | Textural Contrast | Toast in a dry pan until just golden |
Necessary kitchen tools
You don't need a professional bakery to pull this off, but a few specific tools make the process much smoother. A 9x13 inch baking pan is the standard here, but make sure it's a metal one if possible, as they conduct heat more evenly than glass.
For the "poke" part, a sturdy dinner fork is your best tool. I once tried using a skewer, but the fork allows you to create slightly wider channels, which helps the delicious creamy coconut cake soak up the mixture more efficiently.
You'll also want a hand mixer or a whisk for the coconut infusion to make sure the condensed milk and cream of coconut are fully integrated.
The Cooking Process
Right then, let's get into the actual steps. Trust me on the poking part, don't be afraid to really get in there with the fork.
Phase 1: Baking the Foundation
- Preheat your oven as directed on the cake mix box. Combine the cake mix, 3 large eggs, 1/2 cup vegetable oil, and 1 cup water in a bowl. Note: Overmixing can make the cake tough, so stop as soon as it's smooth.
- Beat the mixture until the batter is smooth and glossy.
- Pour the batter into a 9x13 inch baking pan and bake 20 mins until a toothpick comes out clean and the edges are golden brown.
Phase 2: The Infusion Process
- Use a fork to poke holes approximately 1 inch apart across the entire surface while the cake is still warm. Note: Doing this while warm is critical for absorption.
- In a separate bowl, whisk together 1 can (12 oz) cream of coconut and 1 can (14 oz) sweetened condensed milk.
- Continue whisking until the mixture is completely combined and pale white.
- Pour the coconut mixture slowly over the cake, ensuring it fills every hole.
Phase 3: The Chilling & Finishing
- Place the cake in the refrigerator for at least 4 hours (or overnight) to set.
- Spread 8 oz of thawed whipped topping in a thick, even layer across the top.
- Generously sprinkle 1 cup of toasted shredded coconut over the frosting for a crispy contrast.
Fixing common cake mistakes

Even the most experienced home cooks run into a few hiccups. The most common issue I see with this delicious creamy coconut cake is the "soggy bottom," which usually happens if the cake wasn't baked long enough or if the soak was poured on too quickly.
Troubleshooting Common Issues
| Issue | Solution |
|---|---|
| Why Your Cake Is Too Soggy | If the cake feels mushy rather than creamy, you likely didn't allow enough chilling time. The condensed milk needs time to bond with the cake's starches. If you've already frosted it and it's too soft |
| Why Did Your Frosting Slide Off | This usually happens when the cake is still slightly warm in the center. Whipped topping is mostly air and fat, and heat will melt it instantly. Always feel the center of the cake with your finger, it |
| Why Is the Coconut Topping Bland | If your toasted coconut lacks punch, you might have over toasted it or used unsweetened coconut without adding a pinch of salt. Toasting should be a light golden brown, not dark brown. |
Common Mistakes Checklist
- ✓ Check that the whipped topping is fully thawed before spreading.
- ✓ Ensure the coconut is toasted in a dry pan, not oil.
- ✓ Use a metal pan for more consistent browning.
- ✓ Poke holes deeply, nearly to the bottom of the pan.
- ✓ Whisk the condensed milk thoroughly to remove lumps.
Creative ways to vary
Once you've nailed the basic delicious creamy coconut cake, you can start playing with the flavors. I love adding a bit of zest to brighten things up.
If you want a more complex flavor, try adding the zest of one lime to the coconut soak. It gives it a "Key Lime" vibe that is absolutely stunning in the summer. For those who want something even more decadent, you can swap the water in the cake mix for coconut milk.
This makes the sponge itself taste like coconut, rather than just the soak.
If you're serving this as part of a larger spread, it pairs wonderfully with something tart. For example, a dollop of my Classic Peach Jam recipe on the side of the plate adds a beautiful acidity that cuts through the richness of the coconut.
Decision Shortcut
- If you want it richer: Use melted butter instead of oil in the cake base.
- If you want more crunch: Double the toasted coconut to 2 cups.
- If you want it less sweet: Use unsweetened whipped cream instead of the tub topping.
Adjusting the Yield
Scaling a poke cake is a bit different than a standard layer cake because you have to maintain the ratio of holes to liquid.
Scaling Down (1/2 Recipe) Use an 8x8 or 9x9 inch square pan. You'll need to beat 2 eggs and use only half of the mixture. Reduce the baking time by about 20%, as smaller pans can sometimes bake faster. Keep the chilling time the same, as the soak still needs that time to set.
Scaling Up (2x Recipe) I recommend baking two separate 9x13 pans rather than one giant deep pan. If you try to double the depth, the center won't bake, and the soak won't reach the bottom.
If you're baking both pans at once, lower the oven temperature by 25°F and rotate the pans halfway through to ensure even browning.
Coconut Cake Truths
There are a few things people tell you about baking with coconut that just aren't true. I've spent enough time in the kitchen to know where the myths end and the results begin.
One big misconception is that using a box mix is "cheating" and results in a lower quality cake. In the case of this delicious creamy coconut cake, the mix provides a consistent, airy crumb that actually absorbs the soak better than some dense scratch cakes. The mix is just a tool, not a shortcut to quality.
Another myth is that you can't freeze poke cakes. You absolutely can, but you must freeze it before adding the whipped topping. Once the topping is on, the texture can become a bit grainy if frozen and thawed. Freeze the soaked cake, then frost it after it thaws.
Keeping your cake fresh
Because of the high moisture content from the condensed milk, this cake needs to be handled differently than a standard sponge.
Storage Guidelines Keep your cake in an airtight container in the fridge. It will stay fresh for about 4-5 days. I actually think this delicious creamy coconut cake tastes better on day two, as the flavors have more time to meld together.
Freezing Tips As mentioned, freeze the cake after the soak but before the whipped topping. Wrap it tightly in plastic wrap and then foil. It will last up to 3 months. Thaw in the fridge overnight before frosting.
Zero Waste Tips If you have leftover shredded coconut that didn't make it onto the cake, don't throw it away. Toss it into your morning oatmeal or blend it into a smoothie for an easy tropical boost. If you have a bit of the coconut soak left over, it makes a great syrup for pancakes.
The best flavor pairings
This cake is quite rich, so it works best when paired with something that balances the sweetness. While it's a dessert, I often serve it at potlucks where there's a mix of everything.
For a full meal experience, I've found that this dessert is a great finale after a hearty, savory meal. If you've served something like a Broccoli Casserole recipe, the lightness and tropical notes of the cake provide a refreshing contrast to the heavy cheese and cream of the side dish.
You can also serve this with a side of fresh berries, like raspberries or blackberries. The tartness of the berries cuts through the velvety texture of the coconut, making each bite feel a bit more balanced. Trust me, a few fresh berries on top of each slice makes it look like it came from a professional bakery.
Ultimately, this delicious creamy coconut cake is all about comfort and indulgence. It's the kind of treat that makes people slow down and actually enjoy their dessert. Whether you're making it for a big party or just because it's Tuesday, it's a guaranteed winner. Right then, go get your coconut and start baking!
Recipe FAQs
Can I use a smaller pan than 9x13 inches?
No, stick to a 9x13 inch pan. A smaller pan will result in a thicker cake that may be underbaked in the center or overflow during baking.
How to stop the whipped topping from sliding off the cake?
Ensure the cake is completely chilled. Feel the center with your finger to confirm there is no remaining heat, as warmth melts the air and fat in the topping.
Do I need to let the cake cool completely before poking holes?
No, poke the holes while the cake is still warm. This allows the cream of coconut and condensed milk mixture to penetrate deeper into the sponge.
Is it true I can skip the 4-hour chilling period?
No, this is a common misconception. The sweetened condensed milk requires at least 4 hours to properly bond with the cake's starches to avoid a mushy texture.
How to tell when the cake is finished baking?
Insert a toothpick into the center. The cake is done when the toothpick comes out clean and the edges have turned golden brown.
Can I substitute the whipped topping for a lighter option?
Yes, you can use stabilized whipped cream. If you enjoy the airy texture used in our creamy pistachio fluff, a similar whipped approach works well here.
Why is my coconut cake too soggy?
You likely didn't allow enough chilling time. The cake needs the full 4 hours or overnight in the refrigerator for the coconut mixture to set correctly.
Delicious Creamy Coconut Cake