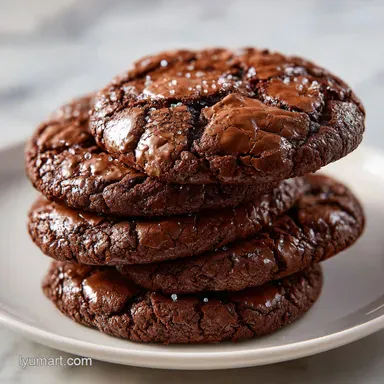
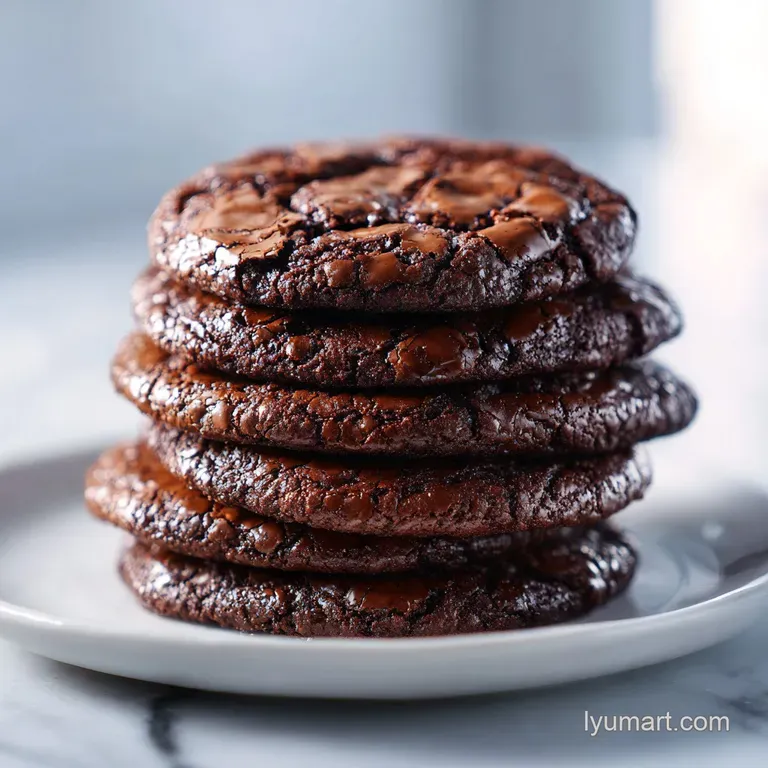
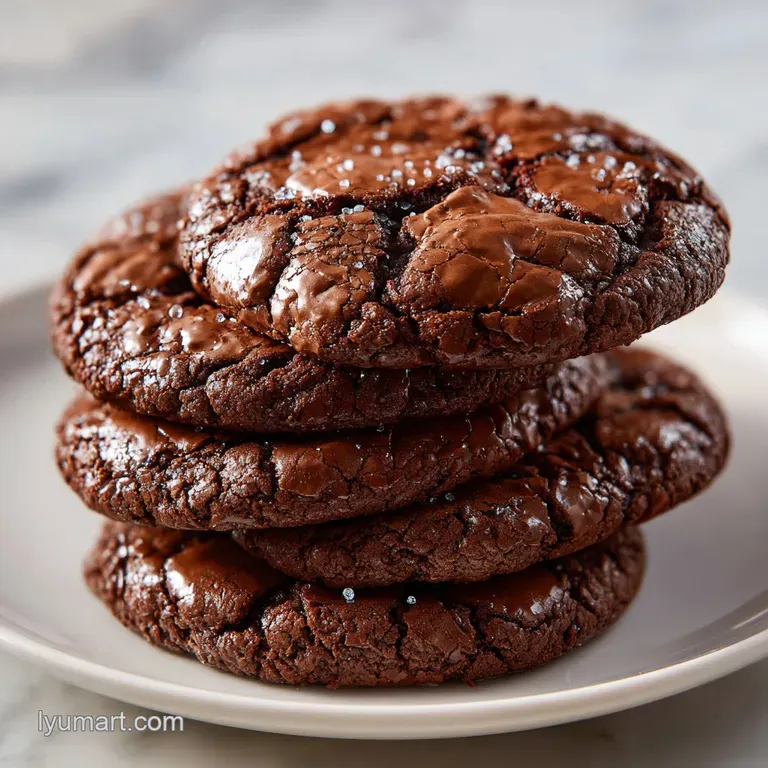
Gourmet Brownie Cookies: Fudgy and Rich
- Time:15 minutes active + 10 minutes baking = Total 25 minutes
- Flavor/Texture Hook: Velvety, fudgy center with a shatter crisp top
- Perfect for: Holiday dessert platters or an instant chocolate fix
The smell of melting butter and cocoa filling the kitchen is, honestly, one of the best things in life. There's something about that deep, dark aroma that just feels like a hug. For me, these treats are a nod to the classic American dessert hybrid.
Brownies started as a cross between a cake and a cookie back in the late 1800s, and people grew to love them because they offer the richness of a truffle with the comfort of a bake.
Growing up, my family had a tradition of making "fudge squares" for every celebration, but they were often too heavy to eat more than one. I wanted something that had that same intense, molten soul but with the portable, handheld convenience of a cookie. That's where these gourmet brownie cookies come in. They aren't just cookies that taste like brownies, they are essentially brownies that have been reshaped into something more shareable.
You can expect a treat that is intensely chocolatey, with a texture that is almost velvety in the middle. We are aiming for that specific balance where the edge is slightly chewy and the center is practically gooey.
Trust me on this, once you see that crackled, papery skin on top, you'll never go back to basic chocolate chip cookies.
The Secret to Gourmet Brownie Cookies
The reason these gourmet brownie cookies feel so professional isn't about fancy equipment, but about how we handle the ingredients. Most cookies rely on creamed butter and sugar for lift, but here, we use melted butter. This changes the entire structure, moving it away from "cakey" and straight into "fudgy" territory.
When you use melted butter, you're not incorporating as many air bubbles into the fat. Instead, the butter blends with the sugar to create a denser, more concentrated base. This is what allows the chocolate flavors to feel more intense and the texture to remain heavy and rich.
It's the difference between a light sponge and a dense ganache.
Another trick is the specific way we handle the cocoa. By using Dutch process cocoa, we get a darker color and a smoother, more mellow flavor. This avoids the sharp acidity found in natural cocoa powder, making the overall taste feel more balanced and luxurious.
It's these small choices that move the recipe from a standard bake to something truly gourmet.
Why the Texture Works
- The Egg Sugar Bond: Beating the eggs and sugar for several minutes creates a stable emulsion that traps air, leading to that signature shiny, crackled top.
- Low Flour Ratio: By keeping the flour minimal, we prevent the gluten from creating a bread like structure, ensuring the center stays velvety.
- Carryover Cooking: Letting the cookies rest on the hot pan uses residual heat to set the center without overbaking the edges.
If you're wondering whether to stick to the tray or try a different approach, here is how the method changes the result.
| Method | Time | Texture | Best For | |-----------|------|----------|----------| | Sheet Pan | 10 mins | Consistent edges, papery top | Large batches, parties | | Skillet | 15-20 mins | Gooey center, caramelized edges | Family style, warm serving | | Individual Molds | 12 mins | Cake like sides, molten core | Fancy plated desserts |Regardless of the method, the goal is always the same: a rich, chocolatey bite that melts in your mouth. But for the most consistent results, the sheet pan is the way to go.
Core Ingredient Analysis
Understanding what each part of the dough does helps you avoid common mistakes. For example, if you use the wrong kind of cocoa, you might lose that deep mahogany color.
| Ingredient | Science Role | Pro Secret |
|---|---|---|
| Dutch process Cocoa | Primary flavor & color | Sift it to avoid "cocoa clumps" in the dough |
| Granulated Sugar | Texture & shine | Don't reduce it, or you'll lose the crackled top |
| Semi sweet Chunks | Texture contrast | Chop a bar instead of using chips for "pools" of chocolate |
| Unsalted Butter | Fat & richness | Melt it, but let it cool slightly so it doesn't cook the eggs |
The Building Blocks
Right then, let's get into what you actually need. I've listed everything below with some alternatives in case your pantry is looking a bit bare.
- Unsalted butter (115 g) - Why this? Provides the fat needed for a fudgy, melt in-your mouth feel. (Substitute: Coconut oil for a dairy-free version, though it's slightly more coconut flavored)
- Granulated white sugar (200 g) - Why this? Essential for the shiny top and the right sweetness. (Substitute: Light brown sugar for a chewier, more molasses like taste)
- Large eggs (2) - Why this? The binding agent that provides structure and lift. (Substitute: 2 flax eggs, but the top won't be as shiny)
- Pure vanilla extract (10 ml) - Why this? Enhances the chocolate notes. (Substitute: Almond extract for a more "wedding cake" flavor)
- Dutch process cocoa powder (45 g) - Why this? Gives that dark, rich, professional color. (Substitute: Natural cocoa powder, but add 1/4 tsp baking soda to balance acidity)
- All purpose flour (95 g) - Why this? Keeps the cookie together without making it cakey. (Substitute: Almond flour for a grain free option, but it will be denser)
- Baking powder (1.5 g) - Why this? Provides just a tiny bit of lift. (Substitute: Baking soda, but use slightly less)
- Salt (1.5 g) - Why this? Cuts through the sugar and highlights the cocoa. (Substitute: Fine sea salt)
- Semi sweet chocolate chunks (170 g) - Why this? Creates pockets of molten chocolate. (Substitute: Dark chocolate for a more bitter, adult taste)
- Flaky sea salt - Why this? The final touch for a professional finish. (Substitute: Coarse kosher salt)
If you're tweaking the recipe for dietary needs, keep these trade offs in mind.
| Original Ingredient | Substitute | Why It Works | |---------------------|-----------|--------------| | All purpose Flour | Almond Flour | Grain free. Note: Results in a denser, moister crumb | | Unsalted Butter | Coconut Oil | dairy-free. Note: Adds a slight tropical note to the chocolate | | White Sugar | Coconut Sugar | Lower glycemic. Note: Darker color and less "crackly" top |When making these changes, remember that baking is a bit of a balancing act. If you swap the sugar, you might lose that specific gourmet brownie cookies look, but the taste will still be incredible.
Essential Baking Tools
You don't need a professional kitchen, but a few things make the process way smoother.
- Large Mixing Bowl: Something sturdy enough to handle vigorous whisking.
- Whisk: A balloon whisk is best for getting those eggs and sugar properly emulsified.
- Sifter or Fine Mesh Strainer: This is non negotiable for the cocoa powder, which loves to clump.
- Silicone Spatula: Perfect for folding in the chocolate chunks without overmixing the batter.
- Baking Sheets: Heavy duty rims help prevent warping.
- Parchment Paper or Silicone Mats: Essential for a non stick experience.
- Cookie Scoop: A medium sized scoop ensures all 24 cookies are the same size and bake evenly.
Step by step Guide
Let's crack on. Follow these steps closely, and pay attention to the sensory cues - that's how you know you're on the right track.
- Heat the oven. Preheat your oven to 350°F (175°C) and line your baking sheets with parchment paper. Note: This ensures the butter doesn't melt too much before the cookies hit the heat.
- Combine fats and sweets. In a large bowl, whisk the melted butter and sugar until combined.
- Emulsify the base. Add the eggs and vanilla, beating the mixture vigorously for 2–3 minutes. Wait until the batter looks pale and glossy.
- Sift the dry ingredients. Sift in the cocoa powder, flour, baking powder, and salt.
- Fold gently. Using a spatula, gently fold the ingredients together until no streaks of flour remain. Note: Do not overmix, or the cookies will become tough.
- Add the chocolate. Fold in the chocolate chunks last.
- Portion the dough. Scoop rounded tablespoons of dough onto the prepared sheets, spacing them 2 inches apart.
- The precision bake. Bake for 9–11 minutes. Remove when the edges are set but the centers still look slightly soft.
- The resting phase. Let the cookies rest on the hot baking sheet for 5–10 minutes. Note: They will firm up as they cool, creating that fudgy center.
- Final touch. Transfer to a wire rack to cool completely and sprinkle with flaky sea salt immediately.
Cookie Troubleshooting Guide
Even the best of us hit a snag. If your gourmet brownie cookies didn't come out quite right, it's usually a simple fix.
Why are my cookies cakey instead of fudgy?
This usually happens if you overmix the batter after adding the flour. Overmixing develops too much gluten, which creates a bread like structure. Next time, stop folding the moment the flour disappears.
Why didn't I get the shiny, crackled top?
The "crackly" skin is a result of the sugar dissolving into the eggs. If you didn't whisk the eggs and sugar long enough, the sugar remains granular, and you won't get that glossy finish.
My cookies spread too much and became flat.
This is often caused by butter that was too hot when mixed or an oven that isn't fully preheated. Ensure your melted butter has cooled slightly before adding the sugar.
DIVTABLE_0
To make sure your next batch is a winner, keep this checklist handy during your process.
Common Mistakes Checklist
- ✓ Sifted the cocoa powder to remove lumps.
- ✓ Whisked eggs and sugar until pale and glossy.
- ✓ Folded dry ingredients gently, no overmixing.
- ✓ Used a timer to avoid overbaking by even 60 seconds.
- ✓ Allowed cookies to rest on the hot pan for 5 minutes.
Flavor Twist Ideas
Once you've nailed the base, you can start playing with the recipe. These gourmet brownie cookies are a great canvas for other flavors.
- The Espresso Boost: Add 1 teaspoon of instant espresso powder to the cocoa. This doesn't make them taste like coffee, but it makes the chocolate taste "darker" and more intense.
- The Peanut Butter Swirl: Drop a half teaspoon of creamy peanut butter on top of each dough ball and swirl it in with a toothpick before baking.
- The Minty Refresh: Replace the vanilla extract with peppermint extract and use dark chocolate chunks.
- The Nutty Crunch: Fold in 50g of toasted walnuts or pecans along with the chocolate chunks.
These treats are the best way to end a meal of juicy burgers on my soft burger bun recipe, providing a sweet, rich contrast to a salty dinner. If you're feeling really indulgent, you can even serve these with a side of velvety chocolate syrup for dipping.
Preservation and Waste Tips
You don't have to eat all 24 at once, although I've certainly been tempted.
Storage Guidelines Keep these in an airtight container at room temperature for up to 5 days. To keep them extra fudgy, place a piece of parchment paper between layers so they don't stick. In the fridge, they'll last about a week and become almost truffle like in texture.
Freezing Instructions These freeze beautifully. Wrap them individually in plastic wrap and place them in a freezer bag for up to 3 months. When you want one, just let it thaw at room temperature for 30 minutes or pop it in the microwave for 10 seconds.
Zero Waste Tips If you have a bit of dough left over that isn't enough for a full cookie, don't throw it away. Roll it into a tiny ball and bake it as a "tester" to check the oven temp. If you have leftover chocolate chunks, melt them down with a splash of cream to make a quick ganache for fruit.
Plating and Serving Ideas
Since we're going for a "gourmet" feel, how you present these matters. I like to think of this in three levels of effort.
The Simple Approach Just a heap of cookies on a ceramic plate with a cold glass of milk. It's classic, honest, and lets the chocolate do the talking.
The Polished Look Stack three cookies in a pyramid. Lightly dust the top with powdered sugar using a small sieve and place a single fresh raspberry on the peak. This looks great for a casual dinner party.
The Restaurant Style Place one warm cookie slightly off center on a rectangular white plate. Add a small quenelle of vanilla bean ice cream on the side. Drizzle a bit of chocolate syrup in a zig zag pattern across the plate and garnish with a sprig of mint.
DIVTABLE_1
Baking Tales Debunked
There are a few things people tell you about brownie cookies that just aren't true.
First, some say you must chill the dough for 24 hours to get a better flavor. While chilling helps with spread, it's not necessary for this specific recipe because we use melted butter. You can bake these immediately and they'll still be fudgy.
Second, you might hear that adding more flour makes them "sturdier" and easier to handle. In reality, adding extra flour turns your gourmet brownie cookies into cakey cookies. Stick to the measurements exactly to keep that velvety center.
Finally, people think that the "shiny top" comes from adding extra sugar. It actually comes from the air whipped into the eggs. If you don't beat the eggs, no amount of extra sugar will give you that professional crackle.
Recipe FAQs
Can I substitute natural cocoa powder for Dutch process?
No, it will change the flavor and color. Dutch process cocoa is neutralized, providing the deep, dark color and mellow taste characteristic of a gourmet brownie cookie.
Why did my cookies spread too much in the oven?
The butter may have been too hot or the dough under beaten. Ensure your melted butter is slightly cooled and that you beat the eggs and sugar for the full 3 minutes to create a stable structure.
How to achieve the shiny, crackled top?
Beat the eggs and sugar vigorously for 2 3 minutes. This process dissolves the sugar and creates a meringue like layer that rises to the surface during baking.
Is it true that baking them longer makes them more brownie like?
No, this is a common misconception. Overbaking dries out the center, turning a fudgy brownie cookie into a dry, cakey biscuit.
How to store these to maintain the fudgy center?
Place them in an airtight container at room temperature. This prevents the cookies from drying out and preserves the dense, chewy interior.
Can I use milk chocolate chunks instead of semi sweet?
Yes, but the cookies will be significantly sweeter. Semi sweet chunks provide a necessary bitter contrast to the sugar and cocoa powder. For a different buttery experience, try our Danish style cookies.
How to tell when the cookies are perfectly done?
Pull them out when the edges are set but the centers look slightly underbaked. They will firm up during the 5 10 minute rest on the hot baking sheet.
Gourmet Brownie Cookies