Baked Chicken Leg Quarters: Ultra Crispy
- Time: 10 min active + 45 min roasting = Total 80 mins (including resting)
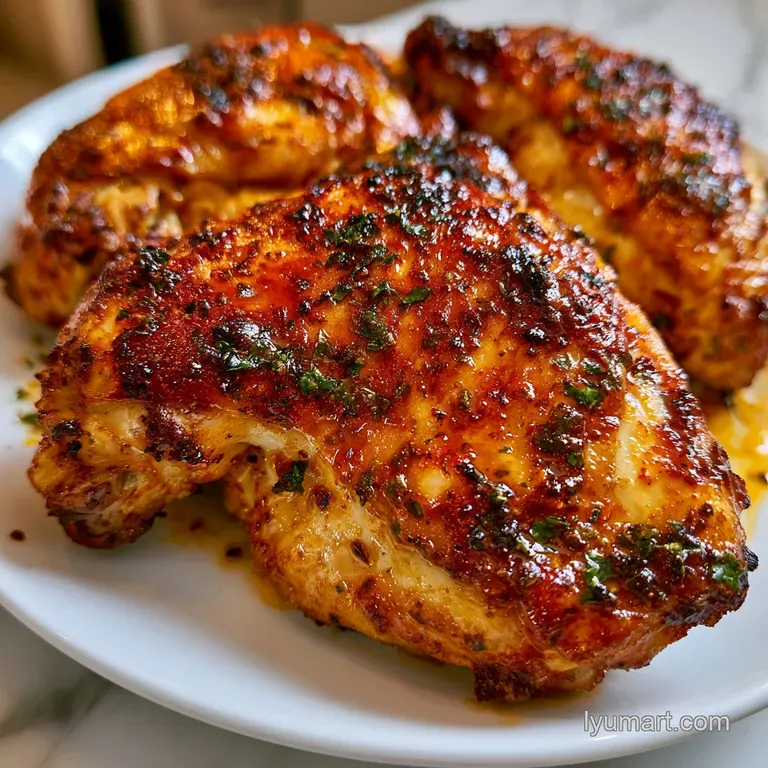
- Flavor/Texture Hook: Smoky, savory skin that cracks open to reveal succulent, juicy meat
- Perfect for: Easy weeknight comfort meals or budget-friendly family dinners
- Easy Baked Chicken Leg Quarters Guide
- Why This Meal Hits the Spot
- The Building Blocks Breakdown
- Must Have Kitchen Gear
- Step-by-Step Roasting Process
- Solving Common Cooking Issues
- Swap outs and Fun Variations
- Scaling Your Roast
- Truth About Chicken Myths
- Preservation Secrets
- Best Ways to Serve It
- Recipe FAQs
- 📝 Recipe Card
Easy Baked Chicken Leg Quarters Guide
That specific sound is what gets me every time - the distinct, audible crackle of the skin as I pull the tray out of the oven. The kitchen smells like a mixture of toasted garlic and smoked paprika, and the chicken has that deep, mahogany glow that makes you want to skip the plates and eat straight from the pan.
I remember the first time I tried making these. I just tossed them in a deep Pyrex dish and hoped for the best. What I got was chicken that had essentially boiled in its own rendered fat. The meat was fine, but the skin was rubbery and pale, which is basically a crime in the world of roasting.
I spent a few weekends tinkering with the setup until I realized the secret wasn't the seasoning, but the airflow.
Once I switched to a wire rack, everything changed. Now, these Baked Chicken Leg Quarters are my go to when I want something that feels like a Sunday feast but takes almost zero effort. You get that contrast of the salty, crisp exterior and the velvety meat that just pulls away from the bone.
Trust me on this, once you stop "boiling" your chicken in a pan, you'll never go back.
Why This Meal Hits the Spot
The reason this specific approach works is all about managing moisture and heat. If the chicken sits in its own grease, the skin can't crisp. By lifting it up, we're essentially creating a 360 degree oven.
- Airflow Gap: The wire rack lets hot air hit the bottom of the thigh, preventing the "soggy bottom" syndrome.
- Skin Dehydration: Patting the skin bone dry removes surface moisture, which allows the fat to render and crisp faster.
- Temperature Target: Cooking to 175°F instead of 165°F allows the connective tissue in the dark meat to break down, making it more tender.
- The Rub Paste: Mixing spices with oil creates a barrier that helps the flavors stick and prevents the spices from burning at 400°F.
Right then, let's look at how the method changes based on what you're starting with.
| Starting Point | Prep Step | Texture Result | Best For |
|---|---|---|---|
| Fresh Quarters | Pat dry & roast | Maximum shatter crisp | Fresh market hauls |
| Frozen (Thawed) | Extra pat dry | Slightly softer skin | Meal prep stocks |
| Pre Brined | Skip extra salt | Very juicy, salty skin | store-bought convenience |
A few minutes of extra effort in the drying phase makes a massive difference. According to Serious Eats, removing surface moisture is the single most important step for achieving a professional grade crust on poultry.
The Building Blocks Breakdown
I've found that a humble mix of pantry staples is all you need here. You don't need fancy rubs; you just need the right balance of salt, heat, and earthiness.
| Ingredient | Science Role | Pro Secret |
|---|---|---|
| Olive Oil | Heat Conductor | Helps the paprika bloom and color deeply |
| Smoked Paprika | Color & Depth | Gives that "grilled" look without the grill |
| Kosher Salt | Moisture Draw | Draws out water from the skin for better crisping |
| Garlic Powder | Umami Boost | More stable than fresh garlic, won't burn at high heat |
For the Signature Rub
I use smoked paprika specifically because it adds a woody note that mimics a charcoal fire. If you use regular paprika, it's still good, but you lose that campfire essence. The garlic and onion powders provide a savory base that penetrates the meat, while the oregano adds a tiny bit of herbal brightness to cut through the richness of the dark meat.
For the Chicken
When you're buying your leg quarters, look for pieces that are roughly the same size. If one is massive and the other is small, the smaller one will dry out before the big one is safe to eat. I usually aim for about 3-4 lbs for four quarters. This ensures they have enough fat to stay juicy during the 45 minute roast.
Must Have Kitchen Gear
You don't need a professional kitchen, but a couple of specific tools make this a breeze.
- Baking Sheet: A standard rimmed sheet works best.
- Wire Cooling Rack: This is non negotiable for that crispy skin.
- Aluminum Foil: Line the pan with this, or you'll be scrubbing rendered chicken fat for an hour.
- Instant Read Thermometer: The only way to be 100% sure the meat is done without cutting into it and letting the juices escape.
Chef's Note: If you don't have a wire rack, you can make a "rack" out of thick slices of onion or carrots. It's a great way to get roasted veggies at the same time, though the airflow isn't quite as perfect.
Step-by-step Roasting Process
Let's crack on with the actual cooking. Follow these steps for the most consistent results.
- Preheat oven to 400°F (204°C). Line your baking sheet with foil and set the wire rack on top. Note: This prevents the foil from bubbling or sticking to the chicken.
- Pat the chicken skin bone dry using paper towels. until no moisture remains on the surface.
- Whisk olive oil, kosher salt, cracked black pepper, smoked paprika, garlic powder, onion powder, and dried oregano in a small bowl. Note: Stir until it becomes a thick, reddish paste.
- Rub the spice paste over the chicken. Ensure you lift the skin and rub the paste directly onto the thigh meat for deeper flavor.
- Set the chicken on the counter for 15 minutes. Note: This takes the chill off, ensuring the meat cooks evenly.
- Place the leg quarters on the rack, skin side up.
- Bake in the center of the oven for 40-45 minutes until the skin is deeply browned and crackling.
- Use your thermometer to check that the thickest part of the thigh has reached 175°F (79°C).
- Remove from the oven and let the meat rest for 5-10 minutes. until the juices settle back into the fibers.
Solving Common Cooking Issues

Even with a simple recipe, things can go sideways. Most of the time, it's a temperature or moisture issue.
The Skin Isn't Crispy
If your skin is soft, it's usually because there was too much moisture on the surface or the oven wasn't hot enough. Make sure you aren't overcrowding the pan, as this creates a steam chamber.
The Meat is Tough or Undercooked
Dark meat is forgiving, but if it's tough, it's likely undercooked near the bone. According to USDA FoodData, poultry is safe at 165°F, but for leg quarters, 175°F is the sweet spot for texture.
| Problem | Root Cause | Solution |
|---|---|---|
| Rub is burnt | Oven too hot/too much sugar | Check oven temp; avoid rubs with honey/sugar |
| Meat is dry | Overcooked beyond 185°F | Use a thermometer to pull at 175°F |
| Skin is pale | Not enough heat or oil | Increase temp to 400°F; ensure oil coating |
Common Mistakes Checklist:
- ✓ Didn't pat the skin dry enough
- ✓ Overcrowded the baking sheet
- ✓ Forgot to let the chicken come to room temperature
- ✓ Pulled the chicken too early (below 165°F)
- ✓ Placed chicken directly on the pan instead of a rack
Swap outs and Fun Variations
The beauty of these Baked Chicken Leg Quarters is that they're a blank canvas. Once you've got the technique down, you can play with the flavors.
For a zesty twist, swap the smoked paprika for lemon zest and a bit of dried thyme. If you want a spicy kick, add a teaspoon of cayenne pepper or chipotle powder to the rub. For those watching their salt intake, you can use a low sodium soy sauce as a base for the rub instead of salt, though it will darken the skin significantly.
If you're planning a bigger meal, you can roast these alongside root vegetables like carrots and potatoes. Just make sure the veggies are cut small enough to cook in 45 minutes. If you find yourself with extra chicken, you can shred the leftovers and use them for my Chicken Enchiladas recipe, which is a great way to stretch a single roast into two meals.
| Original Ingredient | Substitute | Why It Works |
|---|---|---|
| Olive Oil (2 tbsp) | Melted Butter (2 tbsp) | Adds a richer, nuttier flavor. Note: Burns slightly faster than oil |
| Smoked Paprika | Ancho Chili Powder | Similar color and earthiness. Note: Adds a mild, fruity heat |
| Dried Oregano | Dried Basil | Similar herbal profile. Note: Slightly sweeter, more Mediterranean feel |
When adjusting the recipe, keep the oil to spice ratio the same. You want a paste, not a liquid sauce, otherwise the spices will just slide off the skin.
Scaling Your Roast
Cooking for a crowd? Or maybe just for yourself? Adjusting the amount is easy, but the physics of the oven change.
Scaling Down (1-2 quarters): Use a smaller baking sheet to keep the heat concentrated. You can usually reduce the cook time by about 5-10 minutes, but always rely on the thermometer. Since you're using fewer pieces, the airflow is even better, so the skin should be incredibly crispy.
Scaling Up (8+ quarters): This is where people mess up. Do NOT crowd the pan. If the chicken pieces are touching, they'll steam. Work in batches or use two separate baking sheets on different racks.
If using two racks, swap their positions halfway through (at the 22 minute mark) to ensure the bottom tray gets the same top down heat.
For the seasoning, don't just double the salt. I usually go 1.5x on the salt and spices when doubling the meat, then taste a small piece of the rub to see if it needs more. Liquids like oil can be reduced by about 10% because the chicken will release more of its own fat.
Truth About Chicken Myths
I've heard a lot of "old wives' tales" in the kitchen. Let's clear a few things up.
The Searing Myth: Many people think you need to sear chicken in a pan to "seal in the juices." This is simply not true. Searing adds flavor through browning, but it doesn't create a waterproof seal.
The high heat of a 400°F oven does the same job for the skin without the messy splatter.
The Room Temp Myth: Some say you shouldn't let meat sit out. While safety is key, 15-20 minutes is perfectly fine and prevents the "cold center" problem. If the meat is ice cold when it hits the oven, the outside will overcook before the bone deep meat is safe to eat.
Preservation Secrets
Once you've made a batch of Baked Chicken Leg Quarters, you might have leftovers. Here is the best way to handle them.
Fridge Storage: Store in an airtight container for up to 4 days. To reheat without ruining the skin, avoid the microwave. Use an air fryer at 350°F for 5 minutes or put them back in a hot oven for 10 minutes.
This brings back the shatter crisp texture.
Freezing: You can freeze cooked leg quarters for up to 3 months. Wrap them tightly in foil and then place them in a freezer bag. Thaw in the fridge overnight before reheating in the oven.
Zero Waste: Don't throw away those bones! After you've eaten the meat, toss the bones into a pot with water, a carrot, and a stalk of celery. Simmer for a few hours to make a rich, homemade chicken stock. It's a goldmine of flavor and far better than anything you can buy in a carton.
Best Ways to Serve It
These leg quarters are quite rich and savory, so you want sides that bring some brightness or acidity to the plate.
I love pairing this dish with something light and fresh. Since these are quite rich, pairing them with something light like cooked spaghetti squash balances the plate perfectly. The natural sweetness of the squash cuts through the smokiness of the paprika.
If you're feeling more traditional, a side of garlic mashed potatoes or a crisp coleslaw with a vinegar based dressing works wonders. A squeeze of fresh lemon juice over the chicken right before serving is the final touch that wakes up all the flavors.
It's a humble, comforting meal that satisfies the whole family without leaving you with a mountain of dishes.
Recipe FAQs
How long does it take for leg quarters to cook in the oven?
Bake for 40-45 minutes at 400°F (204°C). Ensure the thickest part of the thigh reaches an internal temperature of 175°F (79°C) for the best texture.
Can a diabetic eat baked chicken?
Yes, baked chicken is a diabetic friendly protein. This specific recipe uses olive oil and spices instead of sugary glazes or honey.
Should I cover leg quarters when baking?
No, leave them uncovered. Covering the chicken traps steam inside the pan, which prevents the skin from becoming crisp and golden brown.
Do you bake chicken at 400 covered or uncovered?
Bake uncovered. Direct exposure to the 400°F heat is necessary to render the fat and achieve a deeply browned skin.
How do I ensure the chicken skin gets really crispy?
Pat the skin bone dry with paper towels before applying the spice rub. Placing the meat on a wire rack also allows hot air to circulate underneath.
Is it true that I should pull leg quarters out of the oven as soon as they hit 165°F?
No, this is a common misconception. While 165°F is the safety minimum, dark meat is more tender and juicy when cooked to 175°F (79°C).
What are the best sides to serve with this chicken?
Pair these quarters with roasted root vegetables or a fresh salad. If you enjoy these savory, aromatic seasonings, you will love the flavor profiles in our chicken shawarma.
Baked Chicken Leg Quarters

