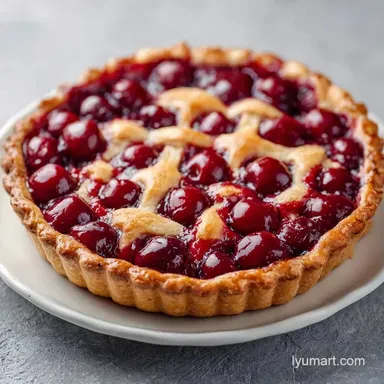
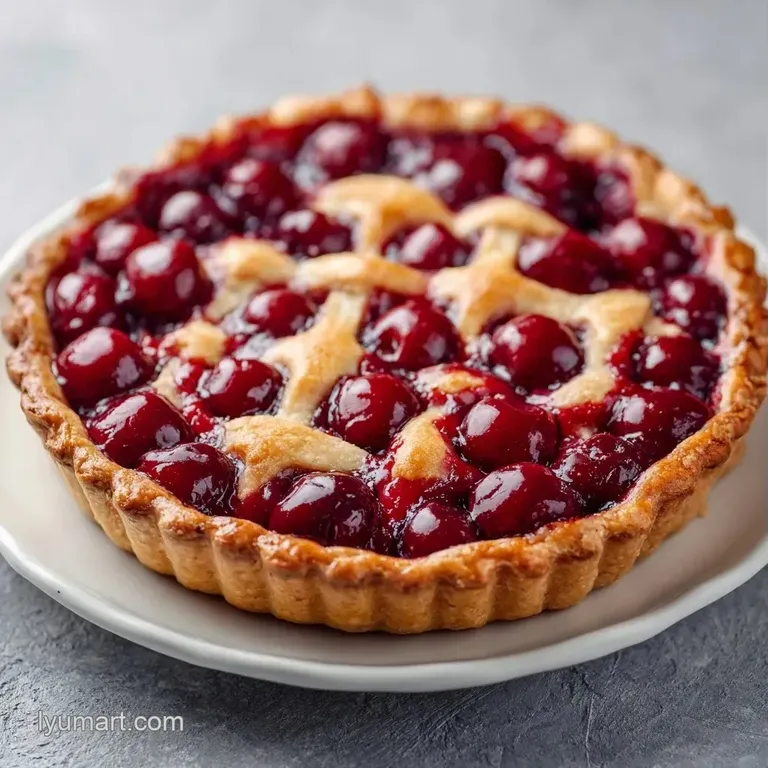
Thick Filling Cherry Pie: Glossy and Jammy
- Time: 30 min active + 1 hour chilling
- Flavor/Texture Hook: Shattering buttery crust with a glossy, jammy center
- Perfect for: Holiday dinner parties or Sunday family gatherings
Have you ever sliced into a beautiful pie only to have the filling run across the plate like a red river? It's a heartbreaking moment, especially when the crust looks gorgeous. I used to think it was just the nature of cherries, but the real issue is the water content in the fruit.
Most recipes just toss the berries with sugar and hope for the best. I found that taking an extra step on the stove changes everything. By simmering the fruit first, we control the thickness before the pie even hits the oven.
This Thick Filling Cherry Pie is all about that contrast. You get the crunch of a sugar dusted lattice and a center that actually holds its shape. It feels like something from a professional bakery, but it's just a few simple steps in your own kitchen.
Why This Thick Filling Cherry Pie Wins
Pre simmered Fruit: Cooking the cherries on the stove first evaporates excess moisture. This means the filling thickens quickly and won't soak into the bottom crust.
Cold Butter Cubes: Keeping the fat cold ensures it doesn't melt into the flour. These little bits of butter create steam pockets in the oven, which is how you get those flaky layers.
The Cornstarch Bond: Cornstarch needs heat to thicken. By bubbling it on the stove, we guarantee the filling is set before it goes into the pastry, preventing the dreaded "pie soup."
| Method | Prep Time | Texture | Best For |
|---|---|---|---|
| Stovetop Filling | Longer | Thick, Jammy | Slicing and serving |
| Raw Filling | Faster | Saucy, Loose | Scooping into bowls |
Right then, let's look at what actually happens inside the bowl to make this work.
What Each Ingredient Does
| Ingredient | What It Does | Best Swap |
|---|---|---|
| Cornstarch | Binds the cherry juices into a gel | Tapioca starch (use slightly less) |
| Almond Extract | Enhances the natural nuttiness of cherries | Extra vanilla extract |
| Ice Water | Hydrates flour without melting butter | Ice cold vodka (for extra flakiness) |
| Coarse Sugar | Adds a crunch to the top crust | Granulated sugar |
The Pantry List
For the crust, you'll need: - 2.5 cups all purpose flour - 1 cup unsalted butter, chilled and cubed Why this? Cold fat is the only way to get flakes - 1 tsp granulated sugar - 1 tsp salt - 8 tbsp ice water
For the Homemade Thick Cherry Pie Filling: - 6 cups pitted cherries Why this? Fresh or frozen both work perfectly - 0.75 cup granulated sugar - 0.25 cup cornstarch - 1 tbsp lemon juice - 1 tsp vanilla extract - 0.25 tsp almond extract - 2 tbsp unsalted butter
For the finish: - 1 large egg - 1 tbsp water - 1 tbsp coarse sparkling sugar
If you're looking for a different fruit vibe, this method works similarly to my Cherry Garcia Ice Cream, where the cherry flavor is concentrated for a punchier taste.
Tools for the Job
You don't need a professional kitchen, but a few things make it easier. Use a 9 inch deep dish pie plate; a standard shallow dish will overflow with this amount of filling. A pastry cutter or two forks help break down the butter.
A medium saucepan is needed for the filling. Make sure it has a heavy bottom so the sugar doesn't burn during the simmer. For the lattice, a rolling pin and a sharp knife or pizza cutter are your best friends.
Bringing the Pie Together
Preparing the Shattering Crust
- Mix the flour, sugar, and salt in a large bowl.
- Cut the chilled butter into the mixture. Use a pastry cutter until pea sized crumbs form.Note: Don't overwork it or the crust becomes tough
- Add ice water one tablespoon at a time. Stir until the dough just holds together when pressed.
- Divide the dough into two discs. Wrap them in plastic and refrigerate for 1 hour.
Creating the Best Thick Cherry Pie Filling
- Combine cherries, sugar, lemon juice, and cornstarch in a saucepan.
- Simmer over medium heat. Stir constantly until the mixture bubbles and looks translucent.Note: This is where the thickening happens
- Stir in the vanilla, almond extract, and 2 tbsp of butter.
- Remove from heat and let it cool completely. Wait until it is room temperature before adding to the crust to prevent melting the fats.
Assembly and Lattice Weaving
- Roll out the first dough disc on a floured surface. Fit it into the 9 inch plate and press it gently into the corners.
- Pour in the cooled filling.
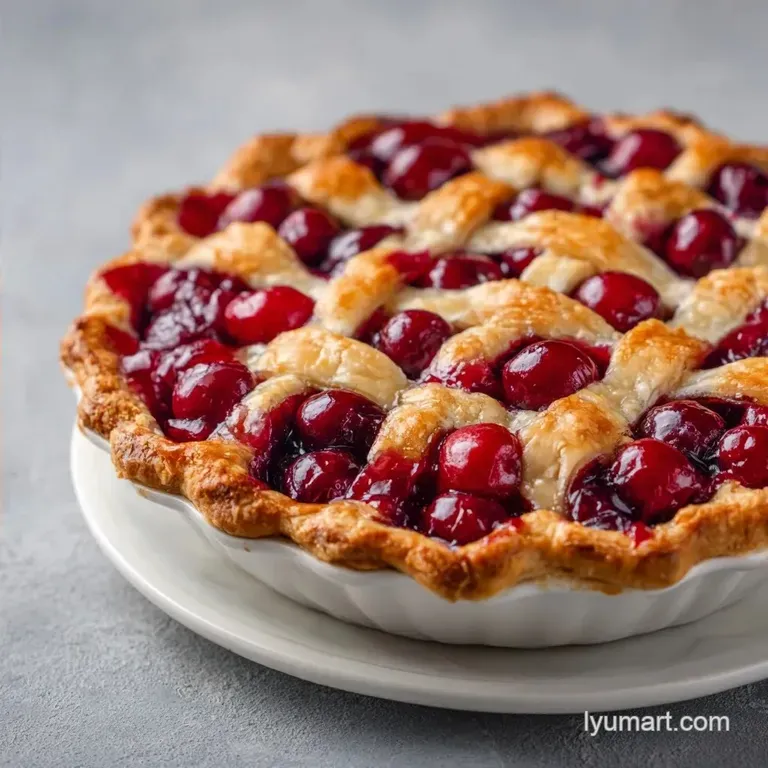
- Roll out the second disc and cut 1 inch strips. Weave the strips in a lattice pattern across the top.
- Trim the edges and crimp them with your fingers or a fork to seal the pie.
The Golden Bake
- Beat the egg with 1 tbsp of water. Brush the lattice lightly.
- Sprinkle the coarse sparkling sugar over the top.
- Bake for 70 minutes until the crust is golden brown and the filling bubbles through the gaps.
Chef's Note: If the edges of the crust start to brown too quickly around the 40 minute mark, cover them with a strip of aluminum foil. This lets the center finish cooking without burning the rim.
Fixing Common Pie Pitfalls
Even with a plan, things happen in the kitchen. Most issues come down to temperature or moisture. If your crust is too tough, you likely over mixed the dough or used water that wasn't cold enough.
Another common issue is the "gap" between the crust and the filling. This happens when the filling is too thick or the crust shrinks. Chilling the dough properly prevents that shrinkage.
Why Your Crust Is Soggy
This usually happens when the filling is too wet or the oven temperature is too low. Using the stovetop reduction method for this Thick Filling Cherry Pie prevents most of this.
The Filling Is Still Runny
If the center hasn't set, it's likely because the cornstarch didn't reach a full boil during the simmer stage. It needs to bubble to activate.
The Edges Are Burning
This occurs when the sugar in the crust caramelizes faster than the fruit cooks. Use a pie shield or foil to protect the edges.
| Problem | Root Cause | Solution |
|---|---|---|
| Soggy Bottom | Filling added while hot | Cool filling completely before filling |
| Tough Crust | Over mixing the dough | Stop mixing the moment it clumps |
| Pale Crust | Egg wash missed or oven too cool | Use egg wash and check oven temp |
But what about the filling? If you want a different fruit, you can use this same base for blueberries or raspberries. Just adjust the sugar based on how tart the fruit is.
Fun Ways to Change it Up
If you want a different flavor profile, try adding a pinch of cinnamon or a grate of orange zest to the filling. For a "Black Forest" twist, serve each slice with a dollop of whipped cream and a few shavings of dark chocolate.
For those who want a vegan version, swap the butter for chilled coconut oil (solid state) and use a flax egg or a bit of maple syrup for the wash. The cornstarch is already vegan, so the filling stays the same.
If you're planning a massive dinner party, this dessert is a great finish after a hearty meal like Italian Stuffed Shells. The acidity of the cherries cuts through the richness of a cheese heavy main course.
Decision Shortcut:
- If you want more tartness, add an extra teaspoon of lemon juice.
- If you prefer a denser filling, increase cornstarch by 1 tablespoon.
- If you're using frozen cherries, don't thaw them first; just toss them in the pan.
Scaling the Recipe
When making a smaller version, such as a 6 inch tart, cut the ingredients in half. Use a smaller pan and reduce the bake time by about 20%. If the recipe calls for one egg for the wash, beat it in a cup and only use half.
For doubling the recipe to make two pies, be careful with the spices. Increase salt and almond extract to 1.5x rather than 2x to avoid an overpowering taste. Work with the dough in batches so the butter doesn't warm up while you're rolling.
If you're baking two pies at once, lower the oven temperature by about 10°C and extend the time by 10-15 minutes. This ensures both pies brown evenly without the bottom one staying raw.
| Original | Half Batch (6") | Double Batch (2 Pies) |
|---|---|---|
| Flour | 1.25 cups | 5 cups |
| Cherries | 3 cups | 12 cups |
| Bake Time | ~55 minutes | ~80 minutes |
Baking Truths
Searing the crust with egg wash isn't just for looks. It creates a protein barrier that helps the crust brown and prevents too much steam from escaping the dough.
Many people think you should "blind bake" a fruit pie crust. Honestly, don't bother. As long as your filling is pre thickened, the bottom crust will cook through just fine during the 70 minute bake.
Another myth is that you need expensive specialty flour. Standard all purpose flour works perfectly here as long as the butter stays ice cold. The fat is what does the heavy lifting for the texture.
Keeping it Fresh Long Term
Fridge Storage
Store your sliced pie in an airtight container in the fridge for up to 5 days. To keep the crust from getting soft, place a piece of parchment paper between layers of pie.
Freezer Storage
You can freeze this Thick Filling Cherry Pie in two ways. You can freeze it unbaked, then bake it from frozen (add 15 minutes to the time). , bake it fully, cool it, and wrap it tightly in foil and plastic wrap for up to 3 months.
Reheating
Avoid the microwave, as it makes the crust chewy. Use the oven at 150°C for about 15-20 minutes until the center is warm. This restores the crispness of the lattice.
Zero Waste Tips
Don't throw away the cherry stems if you're pitting them by hand; some people dry them for tea. If you have leftover dough scraps, roll them into small cookies, sprinkle them with cinnamon sugar, and bake them for 10 minutes as a little snack for the baker.
What to Serve Beside It
The best way to eat this is with a scoop of vanilla bean ice cream. The cold cream melts into the warm, jammy cherries and creates a beautiful contrast.
If you want something lighter, a dollop of crème fraîche or Greek yogurt adds a tangy note that balances the sugar. For a more traditional Southern style, serve it with a sharp slice of cheddar cheese on the side.
Right then, you've got everything you need. Just remember to keep that butter cold and let that filling bubble on the stove. Your kitchen is about to smell like a dream. Enjoy your Thick Filling Cherry Pie!
Recipe FAQs
What's the best recipe for cherry pie crust?
Cut chilled butter into flour, sugar, and salt. Mix until pea-sized crumbs form, then gradually add ice water until the dough holds together. Refrigerate the discs for at least one hour before rolling.
Why did my cherry pie turn out runny?
The fruit likely wasn't pre-simmered. Simmering cherries with cornstarch on the stove evaporates excess moisture and activates the thickener before baking. If you enjoyed controlling the fruit consistency here, the same logic applies to our peach jam.
How sweet is cherry pie?
It is moderately sweet with a tart balance. The granulated sugar is offset by the natural acidity of the cherries and a tablespoon of lemon juice.
How many cherries go in cherry pie?
Use 6 cups of pitted cherries. This volume ensures a deep dish filling that remains thick and jammy without overflowing the 9 inch plate.
How to make cherry pie filling taste better?
Stir in almond extract and vanilla. These additions enhance the natural nuttiness of the cherries and add aromatic depth to the sweetness.
How to bake a cherry pie?
Bake for 70 minutes until the crust is golden brown. Brush the lattice with an egg and water mixture and sprinkle with sparkling sugar before placing it in the oven.
What's the most important ingredient in a cherry pie?
Cornstarch is the critical component. It bonds with the fruit juices during the simmer to prevent the filling from becoming a thin syrup.
Thick Filling Cherry Pie