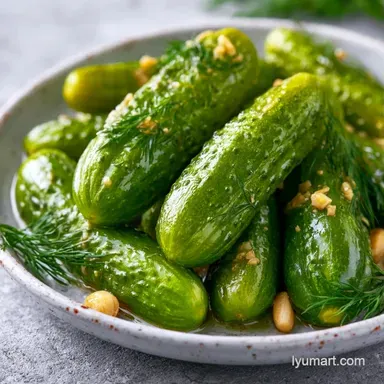
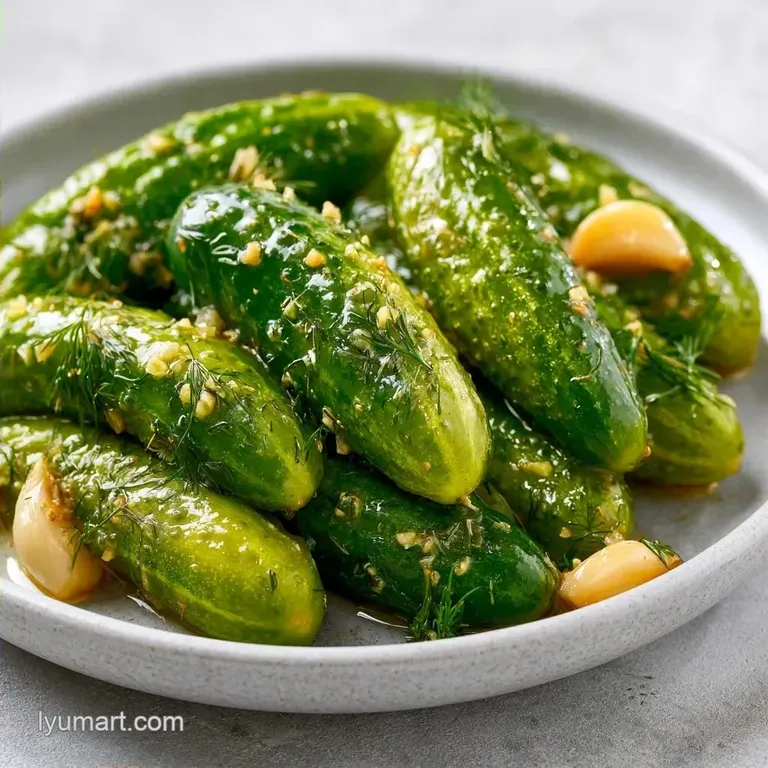
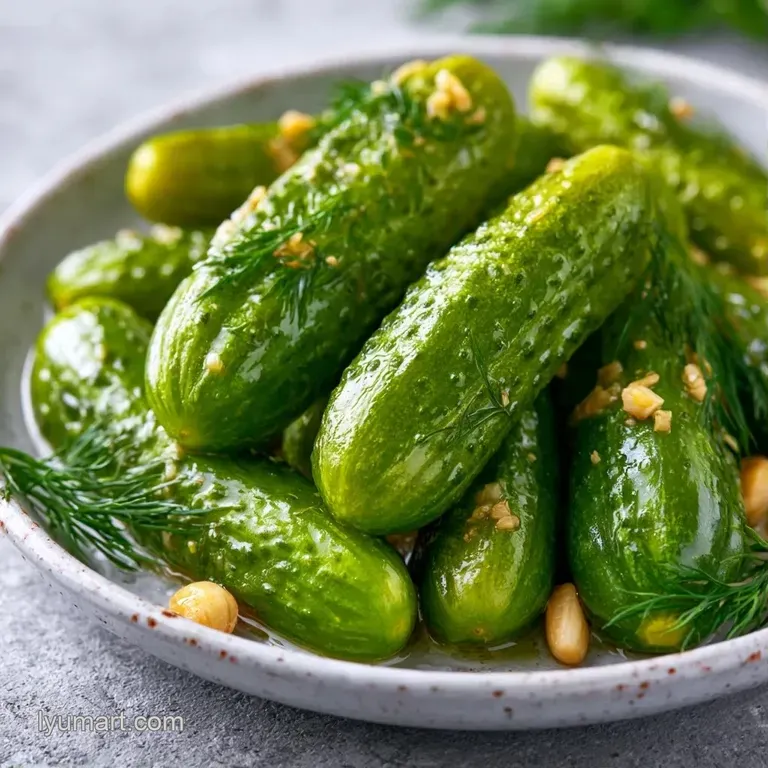
Homemade Pickles with Garlic and Dill
- Time: 15 min active + 24 hours chilling
- Flavor/Texture Hook: Tangy, garlic forward, and satisfyingly crunchy
- Perfect for: Sandwich toppings, charcuterie boards, or a salty snack
I can still remember the smell of my grandmother's kitchen during the autumn harvests. She didn't have fancy gadgets, just a row of glass jars and a huge bowl of cucumbers. For her, and for generations before her, preserving food wasn't a hobby, it was how you survived the winter.
That tradition of turning a garden surplus into something tangy and bright is exactly why I love Homemade Pickles.
It's one of those humble tasks that feels like a bridge to the past. You start with a few basic ingredients and end up with something that tastes like a classic American deli. There's something so satisfying about hearing that first snap when you bite into a spear you made yourself.
Making Homemade Pickles is a rite of passage for any home cook. You'll learn that you don't need a complex canning setup to get a great result. This version focuses on the refrigerator method, which keeps things simple and keeps the crunch.
Making Classic Homemade Pickles
The goal here is to balance the sharp hit of vinegar with a hint of sugar and plenty of garlic. Most people think you need a pressure canner, but the fridge method is faster and often tastes fresher. Trust me on this, the wait is the hardest part, but the result is worth it.
The Brine Balance Factor - Salt Ratio: Salt pulls water out of the cucumber cells, which makes room for the vinegar to move in. - Sugar Hint: A small amount of sugar doesn't make it sweet, it just rounds off the harsh edge of the distilled vinegar.
| Method | Time | Texture | Best For |
|---|---|---|---|
| Quick Fridge | 24 hours | Extra Crunchy | Fresh eating |
| Traditional Canning | Weeks | Softer | Long term storage |
| Fermentation | Days | Funky/Sour | Probiotic fans |
Ingredient Deep Dive
| Ingredient | What It Does | Best Swap |
|---|---|---|
| White Vinegar | Provides acidity | Apple Cider Vinegar (milder) |
| Kosher Salt | Brining and flavor | Sea Salt (avoid table salt) |
| Fresh Dill | Adds herbal notes | Dried dill (use 1/3 amount) |
| Garlic | Pungent depth | Garlic powder (not recommended) |
Shopping List Breakdown
For these Homemade Pickles, the quality of your cucumber is everything. I always go for Kirby or Persian cucumbers. According to Serious Eats, these varieties have thinner skins and denser flesh, which prevents them from turning into mush in the brine.
You'll need a quart sized glass jar. Make sure it's a wide mouth one so you can actually fit the spears in without bruising them. If you're on a budget, don't bother with expensive organic vinegars. Standard white distilled vinegar is the classic choice because it's neutral and lets the dill and garlic shine.
| Original Ingredient | Substitute | Why It Works |
|---|---|---|
| White Vinegar (1 cup) | Apple Cider Vinegar (1 cup) | Similar acidity. Note: Adds a fruitier, slightly sweeter tone |
| Granulated Sugar (1 tbsp) | Honey (1 tbsp) | Same sweetness. Note: Makes the brine slightly thicker |
| Fresh Dill (1/2 cup) | Fresh Parsley (1/2 cup) | Similar fresh, green profile. Note: Less "pickle" flavor |
Necessary Kitchen Tools
You don't need much here. A small saucepan for the brine, a sharp knife, and a cutting board will do. I use a wide mouth Mason jar because it's easy to pack the veg tightly. If you have a jar lifter, use it, but your hands work fine too.
Just make sure your jar is scrubbed clean. Any residue can mess with the brine. I usually rinse mine with very hot water right before filling.
Step-by-step Process
Ready to start your Homemade Pickles? Let's crack on.
Phase 1: Packing the Jar
- Distribute the smashed garlic cloves and black peppercorns at the bottom of a clean wide mouth quart glass jar.
- Tightly pack the cucumber spears vertically into the jar. Note: Vertical packing maximizes space.
- Tuck the fresh dill sprigs into the gaps between the spears until the jar is full.
Phase 2: Simmering the Brine
- Combine white vinegar, water, kosher salt, and sugar in a small saucepan over medium heat.
- Stir occasionally until salt and sugar are completely dissolved and the liquid is just beginning to simmer. Wait until you see tiny bubbles around the edges but do not let it reach a rolling boil.
Phase 3: The Cure
- Carefully pour the hot brine over the cucumbers, ensuring they are completely submerged.
- Tap the jar gently on the counter to release trapped air bubbles and seal the lid tightly.
- Allow the jar to sit at room temperature for 30 minutes.
- Move the jar to the refrigerator to chill for at least 24 hours until the brine is cold and the spears are translucent.
Chef's Tip: If you want an extra crunch, soak your sliced cucumbers in ice water for 30 minutes before packing them into the jar. It firms up the cell walls.
Solving Common Issues
Even with a simple recipe, things can go sideways with your Homemade Pickles. Usually, it comes down to the temperature of the brine or the type of cucumber used.
Why They Get Mushy
Mushiness happens when the cucumber cells break down. This can be caused by using "slicing" cucumbers (which have too much water) or overheating the brine. If the brine is boiling violently, it can "cook" the cucumber before it even hits the jar.
Cloudy Brine Issues
A cloudy brine is usually just the garlic reacting with the vinegar. It's totally normal and doesn't affect the taste. However, if it's extremely cloudy and smells off, it might be contamination.
Salt Not Dissolving
If you see salt crystals at the bottom, you didn't heat the brine long enough. Give it another minute on the stove before pouring.
| Problem | Root Cause | Solution |
|---|---|---|
| Soft texture | Overheated brine | Stop at a simmer, not a boil |
| Bland flavor | Not enough salt | Ensure you use Kosher salt, not table salt |
| Dull color | Old cucumbers | Use fresh, firm Kirby cucumbers |
Customizing Your Jar
The beauty of Homemade Pickles is that you can tweak the flavor to fit your mood. I like to experiment with the aromatics. If you want a bit of heat, toss in a sliced jalapeño or a pinch of red pepper flakes.
For those who prefer a sweeter vibe, you can double the sugar to make them more like "bread and butter" style. If you're looking for a sweet treat to follow your salty snacks, a fresh cherry cake is a great way to reset your palate.
Quick Choice Guide:
- If you want spicy → Add 1 sliced habanero.
- If you want smokey → Add a pinch of smoked paprika to the brine.
- If you want herbal → Add a few fresh mustard seeds.
Adjusting the Batch Size
Scaling Homemade Pickles is pretty straightforward, but don't just multiply everything blindly.
Scaling Down (Half Batch): Use a pint jar instead of a quart. Reduce the cook time for the brine by about 20% since there's less liquid to heat.
Scaling Up (Double or Triple Batch): Work in batches. If you try to cram too many cucumbers into one massive pot, you'll crush them. Also, increase your salt and spices to only 1.5x the original amount. Too much salt in a large batch can make the brine overwhelmingly salty.
Common Pickling Misconceptions
There are a few myths about Homemade Pickles that often trip people up.
Myth: You must use a canner for safety. Not for refrigerator pickles. Since these stay chilled and have high acidity from the vinegar, they are safe in the fridge without the water bath process.
Myth: Table salt works the same as Kosher salt. It doesn't. Table salt has anti caking agents that can make your brine look cloudy and taste metallic. Always stick to Kosher or sea salt.
Keeping Them Fresh
Store your Homemade Pickles in the refrigerator. They stay peak crunchy for about 3 to 4 weeks. After that, they're still safe to eat, but the texture starts to soften.
Don't throw away the brine! The leftover liquid from homemade pickles is a great marinade for grilled chicken or a splash in a potato salad dressing. If you have extra brine, you can also use it to quick pickle some sliced red onions for tacos.
Best Ways to Eat
The most satisfying way to enjoy Homemade Pickles is straight from the jar, but they really shine as a contrast to rich foods. I love them on a juicy burger or alongside a plate of smoked brisket.
Because they are so acidic, they cut through fat perfectly. For a full meal, pair them with a hearty sandwich and perhaps a sour cherry pie for dessert to balance the savory notes.
Just remember to use a clean fork when grabbing them from the jar. Introducing bacteria from your mouth or other foods can shorten the shelf life of your batch. Enjoy your Homemade Pickles!
Recipe FAQs
How to make homemade pickles with white vinegar?
Pack cucumbers, dill, and garlic in a jar, then pour over a simmering mixture of white vinegar, water, salt, and sugar. Let the jar sit at room temperature for 30 minutes before refrigerating for at least 24 hours.
Do homemade dill pickles in vinegar need to be refrigerated?
Yes, they must be kept cold. Since these are not processed in a water bath canner, the refrigerator is necessary to maintain their crunch and ensure safety.
How long does it take for the flavors to develop?
Allow at least 24 hours of chilling. While the hot brine starts the process, the cucumbers need a full day in the fridge to fully absorb the garlic and dill.
Are homemade pickles a good option for diabetic patients?
Yes, in moderation. This recipe uses a small amount of granulated sugar, making it a lower sugar alternative to many commercial brands.
Can the brine from refrigerator pickles be reused?
No, discard it after the first batch. The liquid loses its acidic potency and can harbor impurities, which increases the risk of spoilage in new cucumbers.
How to make these pickles without canning?
Pour hot brine directly over packed vegetables and seal the jar tightly. These are designed as refrigerator pickles, so you can skip the complex boiling water bath process entirely.
Is it true that all home pickles require the 321 brine rule?
No, this is a common misconception. Different recipes use various ratios; this version uses equal parts water and white distilled vinegar for a balanced flavor. If you loved the sweet tart balance in this recipe, see how we use the same acid technique in our cherry sauce.
Homemade Pickles Recipe