Homemade Sour Cherry Pie: Tart and Buttery
- Time: 60 min active + 2 hours chilling
- Flavor/Texture Hook: Tart, jammy filling in a shattering, buttery crust
- Perfect for: Holiday gatherings or a cozy Sunday treat
- Homemade Sour Cherry Pie Success Tips
- What Each Ingredient Does
- The Tools You Need
- The Baking Ingredients
- Step-by-Step Baking Guide
- Solving Common Pie Issues
- Troubleshooting Common Issues
- Flavor Twists to Try
- Adjusting the Recipe Size
- Pie Myths Debunked
- Storage Guidelines
- The Best Pairing Ideas
- Recipe FAQs
- 📝 Recipe Card
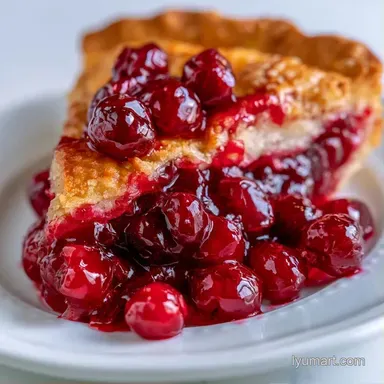
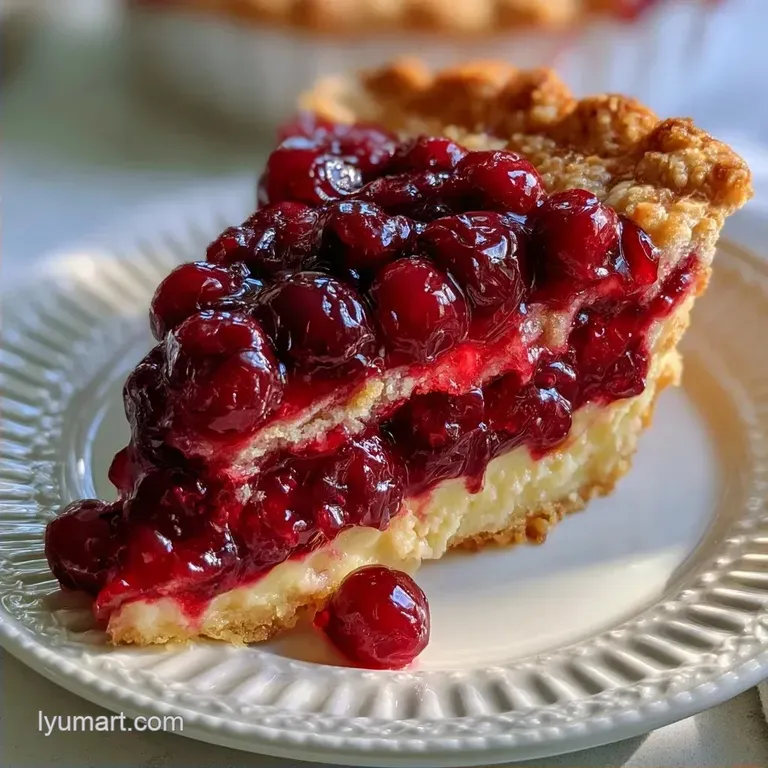
That scent of bubbling cherries and toasted butter hitting the air is everything. I remember the first time I tried this; the house smelled like a bakery for two days. There's something about the way the tart fruit cuts through the rich, salty crust that just works.
You don't need to spend all day kneading dough by hand to get a result that tastes like it came from a professional kitchen. This version focuses on a quick win. You get a high end result without the arm workout, and the flavor is punchy and bright.
When you make this Homemade Sour Cherry Pie, expect a filling that holds its shape but still feels jammy. The crust is the star here, providing a salty, crisp contrast to the sweet tart cherries. It's the kind of dessert that makes people ask for the recipe before they've even finished their first slice.
Homemade Sour Cherry Pie Success Tips
The Cold Butter Factor: Keeping butter in cold chunks means they melt during baking, which leaves little gaps of steam that push the dough apart into flakes.
The Tart Balance: Sour cherries have a natural acidity that cuts through the sugar and butter, so the pie doesn't taste overly sweet.
| Approach | Prep Time | Texture | Best For |
|---|---|---|---|
| Fast (Processor) | 20 mins | Consistent flakes | Weeknight cravings |
| Classic (Hand cut) | 45 mins | Large, irregular shards | Traditionalists |
What Each Ingredient Does
| Ingredient | What It Does | Best Swap |
|---|---|---|
| All Purpose Flour | Provides the structure | 1:1 gluten-free blend (slightly grittier) |
| Unsalted Butter | Creates the flaky layers | Vegan butter sticks (similar fat content) |
| Sour Cherries | Gives that signature tart punch | Frozen tart cherries (thawed and drained) |
| Cornstarch | Thickens the juices | Arrowroot powder (clearer finish) |
The Tools You Need
You can get away with a few basic bowls, but a food processor is where the magic happens for the crust. It handles the butter much faster than a pastry cutter, which keeps the dough colder. I usually use a 9 inch glass pie plate because it distributes heat evenly.
A sharp knife or kitchen shears are handy for venting the top crust. If you don't have a pastry brush, a clean paper towel works just as well for applying the egg wash. Trust me, don't skip the egg wash, or you'll miss out on that glossy, golden finish.
The Baking Ingredients
- 2.5 cups (315g) all purpose flour Why this? Standard protein content for a sturdy but tender crust
- 1 tsp (6g) fine sea salt
- 1 tbsp (12g) granulated sugar
- 1 cup (225g) unsalted butter, chilled and cubed Why this? Cold fat is the only way to get flakes
- 8 tbsp (120ml) ice cold water
- 6 cups (1.3kg) pitted sour cherries Why this? Much more flavor than sweet cherries
- 0.75 cup (150g) granulated sugar
- 0.25 cup (32g) cornstarch Why this? Prevents a runny, soup like filling
- 2 tbsp (28g) unsalted butter, diced
- 1 tsp (5ml) almond extract Why this? Enhances the cherry flavor without tasting like almonds
- 1 tbsp (15ml) lemon juice
- 1 egg (50g)
- 1 tbsp (15ml) water
- 1 tbsp (12g) coarse sanding sugar
Step-by-step Baking Guide
- Combine flour, salt, and sugar in a food processor and pulse 3 times to integrate.
- Add chilled butter cubes and pulse until the mixture resembles coarse crumbs with some pea sized chunks remaining. Note: Over pulsing makes the crust tough
- Gradually add ice water one tablespoon at a time, pulsing until the dough just begins to clump together.
- Divide dough into two discs, wrap in plastic, and refrigerate for at least 2 hours.
- In a large bowl, combine the sour cherries, sugar, cornstarch, almond extract, and lemon juice.
- Fold in the diced butter pieces to the cherry mixture. Note: These bits melt into the sauce for a rich finish
- Roll out the first disc and fit it into your pie plate. Pour in the cherry mixture.
- Roll out the second disc and place it over the top, trimming the edges and crimping them to seal.
- Brush the top with the egg and water mixture, then sprinkle with sanding sugar.
- Bake 50 mins until the crust is deep golden and the filling bubbles through the vents.
Solving Common Pie Issues

Getting a Homemade Sour Cherry Pie just right takes a bit of intuition. If your crust feels too dry when you're pulsing, add water one teaspoon at a time. Too much water leads to a shrinky crust that pulls away from the edges.
Troubleshooting Common Issues
| Issue | Solution |
|---|---|
| Why Your Crust Is Tough | This usually happens when you overwork the dough. If you keep mixing after it clumps, you develop too much gluten. The result is a bread like crust instead of a flaky one. |
| Why Your Filling Is Runny | If the juices don't thicken, the cornstarch might not have reached the proper temperature. The filling needs to actually bubble to activate the starch. |
| Why Your Bottom Is Soggy | This is the classic pie struggle. It happens when the juices soak into the bottom crust before it can set. Putting your pie on the lowest rack helps the bottom brown faster. |
Flavor Twists to Try
If you want to change things up, try adding a pinch of cinnamon to the flour. It adds a warm, earthy note that pairs well with the tartness. For a bit more crunch, you can use a Pie for 9 Servings recipe by replacing the top crust with a buttery streusel.
Another trick is adding a teaspoon of orange zest to the filling. It brightens the whole dish and makes it feel a bit more modern. If you're feeling adventurous, a splash of amaretto instead of almond extract adds a sophisticated depth to the Homemade Sour Cherry Pie.
Decision Shortcut: - If you want more zing, add an extra teaspoon of lemon juice. - If you want a richer taste, use browned butter in the crust. - If you want it less sweet, reduce the sugar in the filling by 2 tablespoons.
Adjusting the Recipe Size
When scaling this recipe down to a half batch, use a 6 inch pan instead of a 9 inch one. You'll need to reduce the baking time by about 20%, so start checking for doneness at 35 minutes. For the egg wash, beat one egg in a cup and just use half of it.
For a double batch, don't just double the salt and spices; use about 1.5x the amount to avoid overpowering the fruit. I recommend baking two separate pies rather than one giant one.
If you must use a larger, deeper pan, lower the oven temperature by 25°F and extend the baking time to ensure the center sets.
| Original | 1/2 Batch | Double Batch |
|---|---|---|
| Flour | 1.25 cups | 5 cups |
| Cherries | 3 cups | 12 cups |
| Bake Time | ~35-40 mins | 50-60 mins (separate pans) |
Pie Myths Debunked
Some people think you have to use a chilled marble slab to roll out dough. While it helps, a cold countertop or even a piece of parchment paper works fine as long as the dough itself is cold.
Another common belief is that you should pre cook the cherry filling. You don't need to do this for Homemade Sour Cherry Pie. Baking the filling inside the crust allows the juices to thicken and meld with the pastry, creating a better texture.
Storage Guidelines
Store your pie on the counter for up to 2 days, but keep it covered. If your kitchen is warm, it's safer to pop it in the fridge after it cools completely. In the refrigerator, a slice stays fresh for about 5 days.
For the freezer, wrap individual slices in plastic wrap and then foil. They'll last up to 3 months. To reheat, avoid the microwave if you want to keep the crust crisp. Instead, put a slice in a 350°F oven for 10-15 minutes until the filling is warm again.
As for zero waste, don't toss the leftover cherry pits if you're pitting by hand. While you can't eat them, some people use them in homemade crafts. More importantly, any leftover dough scraps can be rolled out, sprinkled with cinnamon sugar, and baked as "pie fries" for a quick snack.
The Best Pairing Ideas
The acidity of this pie makes it a natural partner for creamy desserts. A scoop of Homemade Cherry Garcia Ice Cream creates a bit of a theme, but a simple vanilla bean ice cream is the gold standard. The cold cream melting into the warm, tart filling is pure magic.
If you want something lighter, a dollop of unsweetened whipped cream with a hint of lemon zest works wonders. For those who love a contrast, a sharp slice of cheddar cheese on the side is a traditional pairing that balances the sweetness.
Plating Your Pie
Depending on who you're serving, you can change how this looks on the plate. A Homemade Sour Cherry Pie is naturally beautiful, but a few tweaks can make it feel like a treat.
| Level | Presentation | Garnish |
|---|---|---|
| Simple | Thick wedge on a plain plate | None |
| Polished | Centered slice, dusted sugar | Fresh mint leaf |
| Restaurant | Offset slice, sauce swipe | Vanilla cream + cherry reduction |
Precision Checkpoints: 1. The dough must chill for exactly 2 hours to prevent shrinkage. 2. The oven should be preheated to 400°F for the initial sear (if using a blind bake method) or 375°F for standard. 3.
The filling is done when it reaches a bubbling simmer, usually at the 50 minute mark.
Recipe FAQs
What is the difference between cherry pie and sour cherry pie?
Sour cherry pie uses tart cherries to provide a natural acidity. If you loved the sweet tart balance in this recipe, see how we use the same acid technique in our Russian summer soup.
Are sour cherries good for pie?
Yes, they are the ideal choice. Their higher acidity and firmer texture hold up better during baking and create a more complex flavor profile than sweet cherries.
How many cherries go in cherry pie?
Use 6 cups of pitted sour cherries. This quantity ensures the pie is generously filled without the filling overflowing during the bake.
How to prevent a soggy bottom crust?
Ensure the filling bubbles during baking. The cornstarch must reach a boiling point to activate and thicken the juices, which prevents liquid from soaking into the bottom dough.
Why is my pie crust tough instead of flaky?
You likely over pulsed the dough. Mixing the flour too much develops excess gluten, which creates a bread like texture rather than a tender, flaky crust.
How to store and reheat leftover slices?
Keep slices covered on the counter for 2 days or refrigerated for 5. Reheat in a 350°F oven for 10-15 minutes to restore the crispness of the crust.
Is it true that I must pulse the dough until it is completely smooth?
No, this is a common misconception. Stop pulsing when the mixture resembles coarse crumbs with pea-sized chunks of butter remaining to ensure the crust stays flaky.
Homemade Sour Cherry Pie